Vietspices Search

Wednesday, August 25, 2010

Chè Xoài (Mango Pudding)


Sweet mango is one of my kids' favorite fruits.   I usually buy it in a big box.  Sometimes we couldn't finish them on time and they would spoil.   A few weeks ago, I bought a box of ripe mangoes at such a good deal, but knew that we won't be able to finish them in a couple days, so I thought of using some of these mangoes to make chè xoài, mango pudding. It turned out great! The nice thing is you can enjoy it either hot or cold, but I like it best cold when it's hot. 
* * *
*
Recipe:  Chè Xoài
*
Ingredients
*

4 ripe mangoes, peeled,
1/4 cup of bột bán (tapioca pearls)
1/2 cup sugar
1 small can of coconut milk
1  cup water
vanilla
*
Making Mango Pudding


Separate mangoes from seeds.  Add 2 mangoes in a food processor and puree it.  Dice the other 2 mangoes into small cubes.  Set them aside.

In a pot, boil water then add tapioca pearls.  Reduce the heat to medium.  When tapioca pearls turn color, add coconut milk and sugar.  Bring it to boil again.  Adjust the sweetness to your liking.  Remove it from heat.  Add vanilla, then transfer it to a glass bowl or any bowl. 

I made the tapioca a day before; therefore, it looks so thick :( 

Let it cool down then add mango puree and cubes into tapioca bowl. 


Chill it in the fridge and you're done! 


Enjoy a bowl of fresh, sweet and chunky mango pudding!

Monday, August 16, 2010

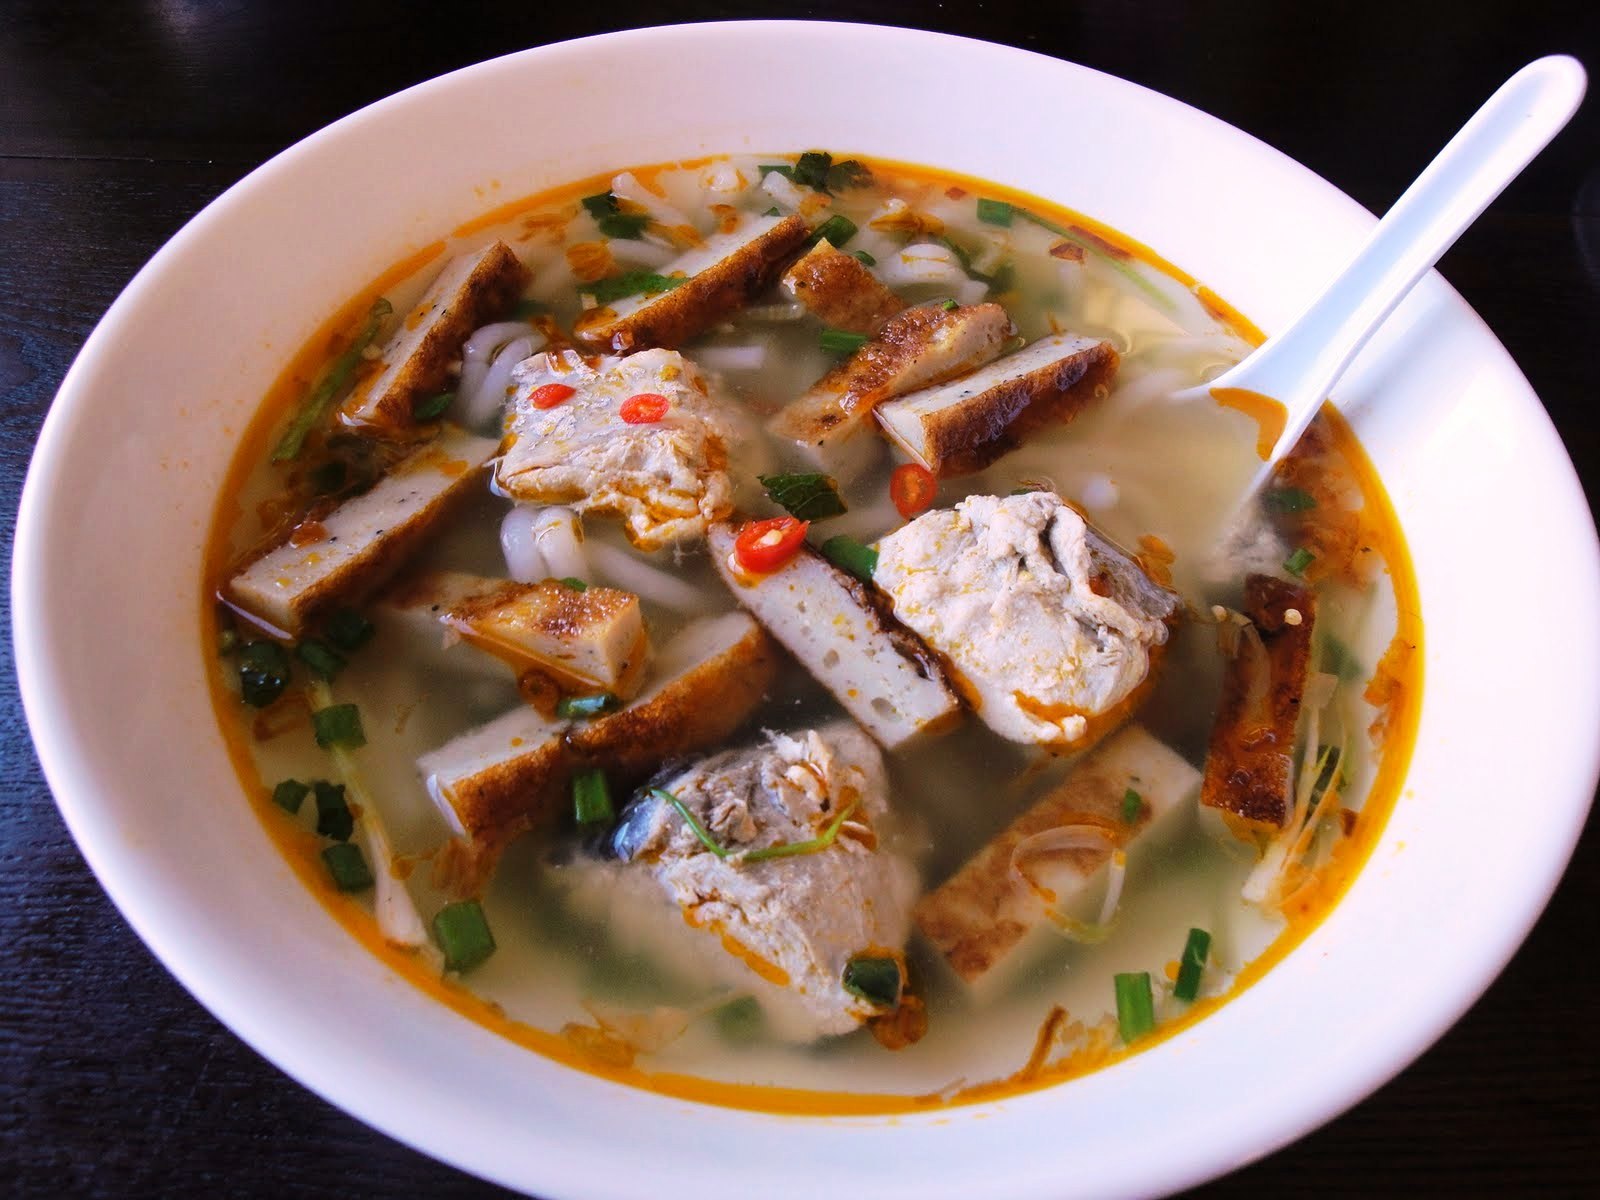
Bánh Canh Chả Cá (Vietnamese Fish Patty Udon Soup)


A few years back, my husband and I traveled back to Viet Nam. We hunted for good food from Saigon in the south to Ha Noi in the north. Bánh canh chả cá was one of the great dish that we tried out in Da Nang and Nha Trang. These cities are well-known for bánh canh chả cá (Fish Patty Udon Soup). The cha ca was soft and yet chewy and the soup was filled with a bold flavor. Fried cha ca has a wonderful smell while steamed cha ca added more sweetness to soup base. I love the combination of both types of cha ca as this brings out a nice contrast.

bánh canh  using potato ricer
There are two types of bánh canh - bánh canh bột gạo (rice udon) and bánh canh bột mì (tapioca udon). The tapioca udon has a chewy consistency and it goes well with bánh canh cua (crab udon soup) while the rice udon pairs well with chả cá (fish patty) or pork hock (giò heo).

My family enjoys fish a lot. Beside Cá Nướng, Chả Cá, Cá Nhúng Dấm (slices fish dip in vinegar broth) , Bún Cá (Fish Noodle Soup) , I also often make home-made bánh canh chả cá with my home-made fresh bánh canh (udon). The entire process of making fresh udon takes less than 30 minutes.

making bánh canh with hands 
The other day, we bought a big piece of King Mackerel Steak from the Saturday open market . I used it to make the broth for bánh canh broth. Both fresh bánh canh and the broth turned out wonderfully. 
* * *
*
RECIPE: Bánh Canh Chả Cá

Printable Recipe

*
Ingredients


For Bánh Canh Broth
3-4 pieces of Mackerel Steaks, cut into big chunks
5 quarts of Water
1 pound of Fish Paste, fried, cut into small pieces

Fish sauce
*
For Bánh Canh
click here for recipe
or use store-bought bánh canh
*
Accompaniments
2-3 cloves of garlic, chopped, for Annatto Oil
1 shallot, sliced thinly, for Annatto Oil
1/2 tablespoon Hột Điều (to make Annatto Oil), for garnish
Spring Onion, chopped, for garnish
Rau Ram (Vietnamese Coriander), chopped, for garnish
Cilantro, chopped, for garnish
Black Pepper, for garnish
*
Making Fish Broth


Boil 5 quarts of water in a large pot. Add Mackerel Steak chunks into the boiling water and cook it for about 5 minutes or until it cooked. Use a strainer to remove the foam that is floating in the pot to keep the both clear. Add about 1 and 1/2 tablespoons of salt and 1-2 tablespoons of fish sauce. Taste it and adjust the seasoning to your liking. Reduce the heat to low.
*
Making Fish Patty (click here for recipe)

*
Making Annatto Oil


Heat 1/2 tablespoon of oil and sautee garlic and shallots. Stir it until it begin to brown. Pour it in a small bowl and set it aside.
In a small saucepan, heat 2 tablespoon oil and 1/2 tablespoon annatto seeds over medium heat. Stir constantly, until the oil becomes a rich, orange-red color, about 2 minutes. Remove from the heat and allow to cool. Strain the oil into a garlic and shallots oil bowl. Discarding the seeds.
*
Presentation of Bánh Canh


Bring a broth pot back to a boil. Add udon into the pot over medium heat until the udon is cooked, about 5 minutes. If you only need to make a few bowls, just cook a small batch of broth and udon to keep it fresh.  Bánh canh doesn't taste and look good when it soaks in the broth for too long as it expands.

Transfer the bánh canh soup to a serving bowl, top with fried fish patty. Pour the fish broth and mackerel steak in the bánh canh bowl. Garnish it with cilantro, Vietnamese coriander and spring onion. Drizzle a little bit of annatto oil.  Sprinkle some pepper. Heat your bánh canh bowl up with a few slices of fresh red chili. 

Enjoy!


Tuesday, August 10, 2010

Sương Sáo Hột É và Đười Ươi (Grass Jelly with Basil Seeds and Poonparai Drink)


I often make Sương Sáo Hột É và Đười Ươi  in the summer.  Everyone in my family loves to drink this fresh, cold, sweetened drink, especially in sweltering summer days.  My husband is actually addicted to it.


Hột é is basil seeds.  When soaked in water the seeds of  basil become gelatinous. 

Đười ươi  is Poonparai or Sterculia Lychnophora.  The flesh surrounding the dried seeds swells to eight times its original volume when soaked in water, forming an irregularly shaped, reddish gelatinous mass. After being soaked and the seed kernel removed, the flesh is mixed with granulated white sugar, ice, and soaked basil seeds, and drunk as a cooling drink. This is quite popular in Vietnam, Thailand, and Cambodia.

Both hột é and đười ươi  are used for their medicinal properties.  According to the Chinese medicine, the use of  hột é and đười ươi is to remove heat from the lung, cure sore throat, counteract toxicity, and relax the bowels. This recipe is not intended to treat any symptoms but is offered mainly for your enjoyment. So drink up at your own risk. It is quite refreshing and delicious nonetheless.
* * *
  *  
RECIPE: Sương Sáo Hột É và Đười Ươi
*
Ingredients


1 can Grass Jelly
1/2 bag Basil Seeds
1/2 to 2/3 bag Poonparai
2-3 teaspoons Banana Extract (dầu chuối)
1 1/2-2 bags of Brown Sugar (substitue granulated sugar if preferred)
3 quarts Water

Boil water with sugar until it dissolve.  Add more sugar if the water is not sweet enough for you.  Transfer it into a jar or a large bowl.  Let it cool down.
Soak basil seeds and poonparai in two seperate bowls of warm water for about 20 minutes.
Dice grass jelly into small cubes. Add it into the sugar bowl. 
Use a strainer to remove basil seeds from water and add it in the sugar bowl. 
Separate seed and skin from poonparai flesh.  Squeeze out the water that was absorbed by the poonparai.  Add the flesh into the sugar bowl.
Pour banana extract into the mixed bowl.  Mix it up and keep it cold in the fridge. 

Enjoy!


Monday, August 9, 2010

Kem Flan (Vietnamese Crème Flan)

Espresso Caramel Flan

My family used to run a coffee house when we were still in Vietnam. One of the specialty desserts we served was Flan which is a delicious custard dessert inherited from French colonialism. I was under 10 years old at that time but i still remember how the flan was served; perhaps it was one of my favorite desserts or perhaps it was just anything culinary related that captured my selective memory.

I love the delicate, beautiful amber color and its smooth, velvety texture. The cold of shaved ice reduces the sweetness of the flan's caramel, maintains it's texture and keeps it nice and cool. 

I remembered each flan was made in a very small round, 2/3 inch thick tin cup, about the size of a condense milk can. After it was done, the flan was flipped into a plate, and topped with shaved ice. Flan was made of eggs, milk and condense milk and these ingredients were expensive; therefore, flan was one of those expensive desserts in the 80's. 

A couple weeks ago it was my husband's birthday so I decided to make flan as one of the desserts. Instead of eating plain flan, I garnished fruits on top of the flan to enhance its taste and beauty. 
RECIPE: Kem Flan

Ingredients


Caramel
1/2 cup Sugar
1 tablespoon Espresso, optional

Flan
5 eggs 
5 egg yolks 
1 can 14oz sweet condensed milk 
1 can boiling hot water (use the condensed milk can to measure)
1 can whole milk 
1 bag of vanilla or 2 teaspoons of vanilla extract
*
Directions

Caramelizing the Sugar


Cook sugar in a sauce pan over a moderate heat. Watch the sugar closely as it heats. As the sugar begins to melt and turn from a clear liquid to a golden brown color around the edges, use a spatula move the liquefied sugar from the edges of the saucepan to the center. Be careful not to over stir the caramel- the sugar may start to clump up before it has a chance to melt. Caramel is done when it is just past the smoking point, and it has a deep amber color. At this point, turn off the heat and add the espresso if you like the taste of it.


Immediately pour the caramel into a baking pan and tilt the pan to make sure that the caramel is coated evenly at the bottom of the baking pan. 

At this point, preheat oven at 350 degree.  Make a water bath for flan by placing a baking tray in the middle rack of the oven and add hot water to 2/3 of the tray. 
*
Making Flan


Whisk eggs until blended. In a separate mixing bowl, stir boiling hot water and condensed milk until dissolved. Add whole milk and mix well. Pour the mixture into the eggs bowl and do a quick whisk. Add 1 bag of vanilla or vanilla extract.  Strain it.

*
Baking Flan


Pour flan mixture in a baking pan, place baking pan in the hot water bath.  Place a piece of foil loosely on top of the baking pan to prevent flan from burning.

Bake for about 45 minutes to 50 minutes depend on the type and size of your baking pan. The flan is ready to be removed from the oven when the edges are set. Gently shake the baking pan, the center of the custard should jiggle slightly. You can also insert the tip of a toothpick into the custard near the center. If the flan is still liquid, it needs more time in the oven.  Remove from the water bath and let them cool down.

disposable foil cake pans make a convenient carrier for flan to-go

*
Presentation


Transfer flan to the fridge and chill it for a few hours. Refrigerating the flan overnight is best.  When it's ready to serve, loosen it from the pan with a knife and transfer onto a dessert plate and top with your choice of fruits or just eat it plain.


Enjoy!

Wednesday, July 14, 2010

Cá Hồi Kho (Simmered Salmon)


My brother-in-law is a great cook.   I have tastsed many of his wonderful dishes.  My children love his Roasted Pork.  Once a while, my oldest girl would crave for it. "Mommy, con thèm thịt heo quay của Bác Hiền quá." That  translates to "Mommy, I am craving for uncle Hien's roasted pork."  I have to agree with my daughter that his roasted pork is very appetizing: it's crunchy, juicy and so tasty; the skin is roasted to perfection.  I have to say his roasted Pork tastes better than most that I have eaten at the local restaurants.  

This is one of the dishes that I really want to learn, but so far have not been successful. My brohter-in-law has fail many times on making the roasted pork before he mastered it, so too I must try and try again.

my roasted pork experimental

He has many great dishes and the good news is I did learn one of them; It's so simple and yet so delicious to make. It's a simmered salmon dish.  This dish is ideal as it uses fresh salmon which is healthy for you. it does not require much preparation and does not require much time to complete.
* * *
*
RECIPE:  Simmered Salmon
*
Ingredients
3-4 pieces of salmon
2 tablespoons Oil
2 tablespoons good Fish Sauce (prefer 3 crabs brand)
1 teaspoon ground pepper
1  teaspoon paprika (ớt bột)
1/2 teaspoon of MSG
2-3 whole chilli peppers, optional 
 3-4 White Part of Spring Onion (hành lá), finely chopped 
Green Part of Spring Onion cut about 1 inch long
*
Simmering Salmon

In a large pan, place 1 layer of the salmon slices.  Add the rest of the ingredients except the green part of green onion and cover the pot with a lid.  Bring it to a boil. 
As soon as the sauce is boiling, turn down the heat to low and let it simmer for about 30 minutes. 
Make sure to swirl the pot once a while so that the sauce distribute evenly on all the pieces of fish. 
Once the fish is done, add the green part of spring onion to the pot and it's ready to serve.

Enjoy Simmered Salmon with steamed rice and cucumber or lettuce and herbs!


Tuesday, June 29, 2010

Creme Brulee


It was Father's Day and I wanted to do something special for my wonderful husband who is always a super daddy to my two girls. My husband is a seafood fanatic. He loves seafood so much that whenever I mentioned about clams, mussels, lobsters, crabs, ect...his eyes would light. 

He actually makes it so easy for me to decide what food I should cook up for Father's Day.  The menu was Shrimp Scampi Pasta, Steam King Crabs, Mahi Mahi with Mango Salsa, Lotus root and Jackfruit Salad and one of my favorite desserts, Creme Brulee which is the focus of this post. I would order this dessert at any restaurant I go to that carries  on their menu. 

I found a wonderful Creme Brulee recipe from Ina Garten.  Her recipe calls for Grand Manier orange liqueur.  It took me an hour to drive to different stores just to find it as I have no clue when it comes to hard liquor.  I finally found a sample tiny bottle about 3 tablespoons of Grand Manier orange liqueur at  Bevmo for  6 bucks. 

The finished product has a smooth and creamy, velvety texture.  It just melts in your mouth. But the top is lightly burnt and crispy with a smoky flavor. The word “brulee” means “burnt”. That’s where the blow torch comes in. For the finishing touch, the top of the custard is sprinkled with sugar and subjected to very high heat. The sugar caramelizes to a crispy, brown crust...delicious and crunchy in every heavenly bite. 

This Creme Brulee is very simple and incredibly delicious. 
* * *
*
RECIPE: Creme Brulee
(Making 6 servings)
*
Ingredients

1 extra-large egg
4 extra-large egg yolks
1/2 cup sugar, plus 1 tablespoon for each serving
3 cups heavy cream
1 teaspoon pure vanilla extract
1 tablespoon orange liqueur (recommended: Grand Marnier)
*
Directions

Preheat the oven to 300 degrees F.

In the bowl of an electric mixer fitted with the paddle attachment, mix the egg, egg yolks, and 1/2 cup of the sugar together on low speed until just combined. Meanwhile, scald the cream in a small saucepan until it's very hot to the touch but not boiled. With the mixer on low speed, slowly add the cream to the eggs. Add the vanilla and orange liqueur and pour into 6 to 8-ounce ramekins until almost full.  I used a strainer to strain it while pouring it into the ramekins to remove all the lumps from the eggs. 


Place the ramekins in a baking pan and carefully pour boiling water into the pan to come halfway up the sides of the ramekins. Bake for 35 to 40 minutes, until the custards are set when gently shaken. Remove the custards from the water bath, cool to room temperature, and refrigerate until firm.

To serve, spread 1 tablespoon of sugar evenly on the top of each ramekin and heat with a kitchen blowtorch until the sugar carmelizes evenly.  If you don't have a kitchen blowtorch,  you can put them in the oven on the top rack under the broiler with the oven door open  and watch carefully because they can burn really fast. Allow to sit at room temperature for a minute until the caramelized sugar hardens.


Bon Appetit!

* * *
*
Propane Gas Torch
Propane gas torches are highly flammable and should be kept away from heat, open flame, and prolonged exposure to sunlight. They should only be used in well-ventilated areas. When lighting a propane gas torch, place the torch on a flat, steady surface, facing away from you. Light the match or lighter and then open the gas valve. Light the gas jet, and blow out the match. Always turn off the burner valve to "finger tight" when finished using the torch. Children should never use a propane gas torch.

Thursday, June 24, 2010

Bánh Ít Lá Gai (Gai Leaf Little Cake)


"Muốn ăn bánh ít lá gai lấy chồng Bình Định cho dài đường đi”.


As a popular Binh Dinh saying goes "If you wish to eat banh it la gai,  marry a Binh Dinh man to increase your life expectancy".

Binh Dinh is the land of  Banh It La Gai,  which is made from the five main ingredients: glutinous rice flour, gai leaf, sugar, mung bean and banana leaf.  Banh It La Gai has the sweet taste of sugar, the aroma of sweet rice, the spice of ginger, the starch of mung bean, bitter taste of gai leaf and the grassy perfume of banana leaf.  All of these ingredients bring out a refreshing flavor and a distinctive glossy deep black color that gives the cake its unique color. 

The name Banh It La Gai indicates the two common features of the cake:     “ít” means    “little” referring to the size of  a serving for it only takes a couple bites to finish off a cake, and “lá gai” refers to the pointy serration of the  leaf commonly found abundantly in the tropics of Vietnam, but can easily be grown in the warmth of the California sun as well. 

 I've always been fascinated by how banh it la gai gets its black color as I  had never seen it my entire life  untiil recently.  Sometimes in March this year, I was lucky enough to receive some Gai plants from my mother-in-law's friends. I was determined to make my first batch, but it would have to wait for three months until the first gai plants are ready for harvesting.   The Gai leaves are green but after you ground in a mortar or blend it, its green colour will turn dark green.  Once you steam the cake, the colour will turn black just like the color of  Banh It La Gai that is shown above from my first batch.  The process of making Banh It La Gai may not look appetizing but the finished product is quite pleasing to the palate. 

Pleiku, where I grew up, is very close to the province of Binh Dinh. In the mornings
, many people from Binh Dinh came to  Pleiku  to conduct their daily business.   According to the people of Binh Dinh, the ingredients in Banh It La Gai not only taste good, but are also good for you; they can prevent abdominal pain, keep your stomach warm, and the ash from gai leaves can be used to cure gas pain. 

Banh It La Gai also plays a large role in Vietnamese rituals. This cake is always offered to worship ancestors during the New Year festivals . In marriage rituals, a tray of Banh It La Gai is the gift of the bride’s family to that of the groom to show the skillfulness of the bride who has made it together with the help of other villagers. Any ladies ready to tie the knot soon?

* * *
*

RECIPE: Banh It La Gai
*
Ingredients:
Dough
1 cup of palm or brown sugar
1/2 teaspoon of salt
1  bag of glutinous rice flour (bột nếp)

about 1/2 pound of Gai leaves
1 tablespoon of fresh ginger, peeled and chopped
1 teaspoon of pomelo flavour or vanilla extract


Filling
1/2 bag of mung bean, soaked for a couple of hours or overnight
1  cup of sugar
1 bag or 1 cup of frozen or fresh shredded young coconut
1 teaspoons of pomelo flavour  or vanilla extract
Oil

Wrapping
1 bag of frozen banana leaf, trimmed of any brown edges, washed, and wiped.
Cut into 40 pieces of about 5 x 10

Making Dough
Boil 2 and 1/4 cups of water with brown sugar and salt to make syrup. Remove it from heat and let it cool down.
Wash Gai leaves and removed the hard line in the middle of each leaf.  Bring it to boil for about 15 minutes.  Drain it and squeeze out the water.  Put gai leaves and ginger in a blender and blend it with a little bit of disolved sugar until the texture is super smooth.  Set it aside.

In a mixing bowl, mix well together  flour, gai paste, syrup and vanilla extract.  Kneed if for about 10 minutes until dough is soft and it doesn't stick to your hands or the mixing bowl. If during the kneeding process, dough is still dry, add a little bit more of water in the dough and kneed it again.  Divide dough into 40 balls.


Making Filling
Soak mung beans overnight or a few hours, so it is quicker to cook them. Drain the beans. In a pot, add water about 1/2 inch above the beans and bring it to boil. Reduce the heat to low, stir it and cook with lid on for about 15 minutes or until soft. Mash it.  Add sugar, shredded coconut and vanilla extract. Mix it up well. If it's too dry, add a little more of hot water. Cool off the mixture in room temperature. Divide beans paste into balls equally to the dough balls

Prepare Pastry Ball

Flatten a ball of dough
Take a bean paste ball, put in the middle of the round flat dough.
Close the dough and roll it with your palms to make a ball. Brush oil all over the ball before wrapping it up, so that the cake will not stick on the banana leave after steaming it.

Wrapping

Fold a piece of banana left into a cone shape. Drop the ball dough into it.  Fold in four sides.


Steaming
Steam banh gio over boiling water at medium-high heat for about 20 minutes.

Enjoy.

* If your banh it la gai  is not as black as it's supposed to be, you probably didn't use enough gai leaves. 
* I was a little bit nervous when my dough turned out to be dark green instead of black. But after I steamed it, the color turned out black as I expected. 
* To keep the banh it la gai's wrapping banana leaves lush green, steam banh it la gai without wrapping it first.  After it's cooked, then wrap it with banana leaves and steam it for about 5 or less.  Remove it from the steamer.  I didn't do it this way, that's why my banana leaves turned yellow instead.