Vietspices Search

Tuesday, June 21, 2011

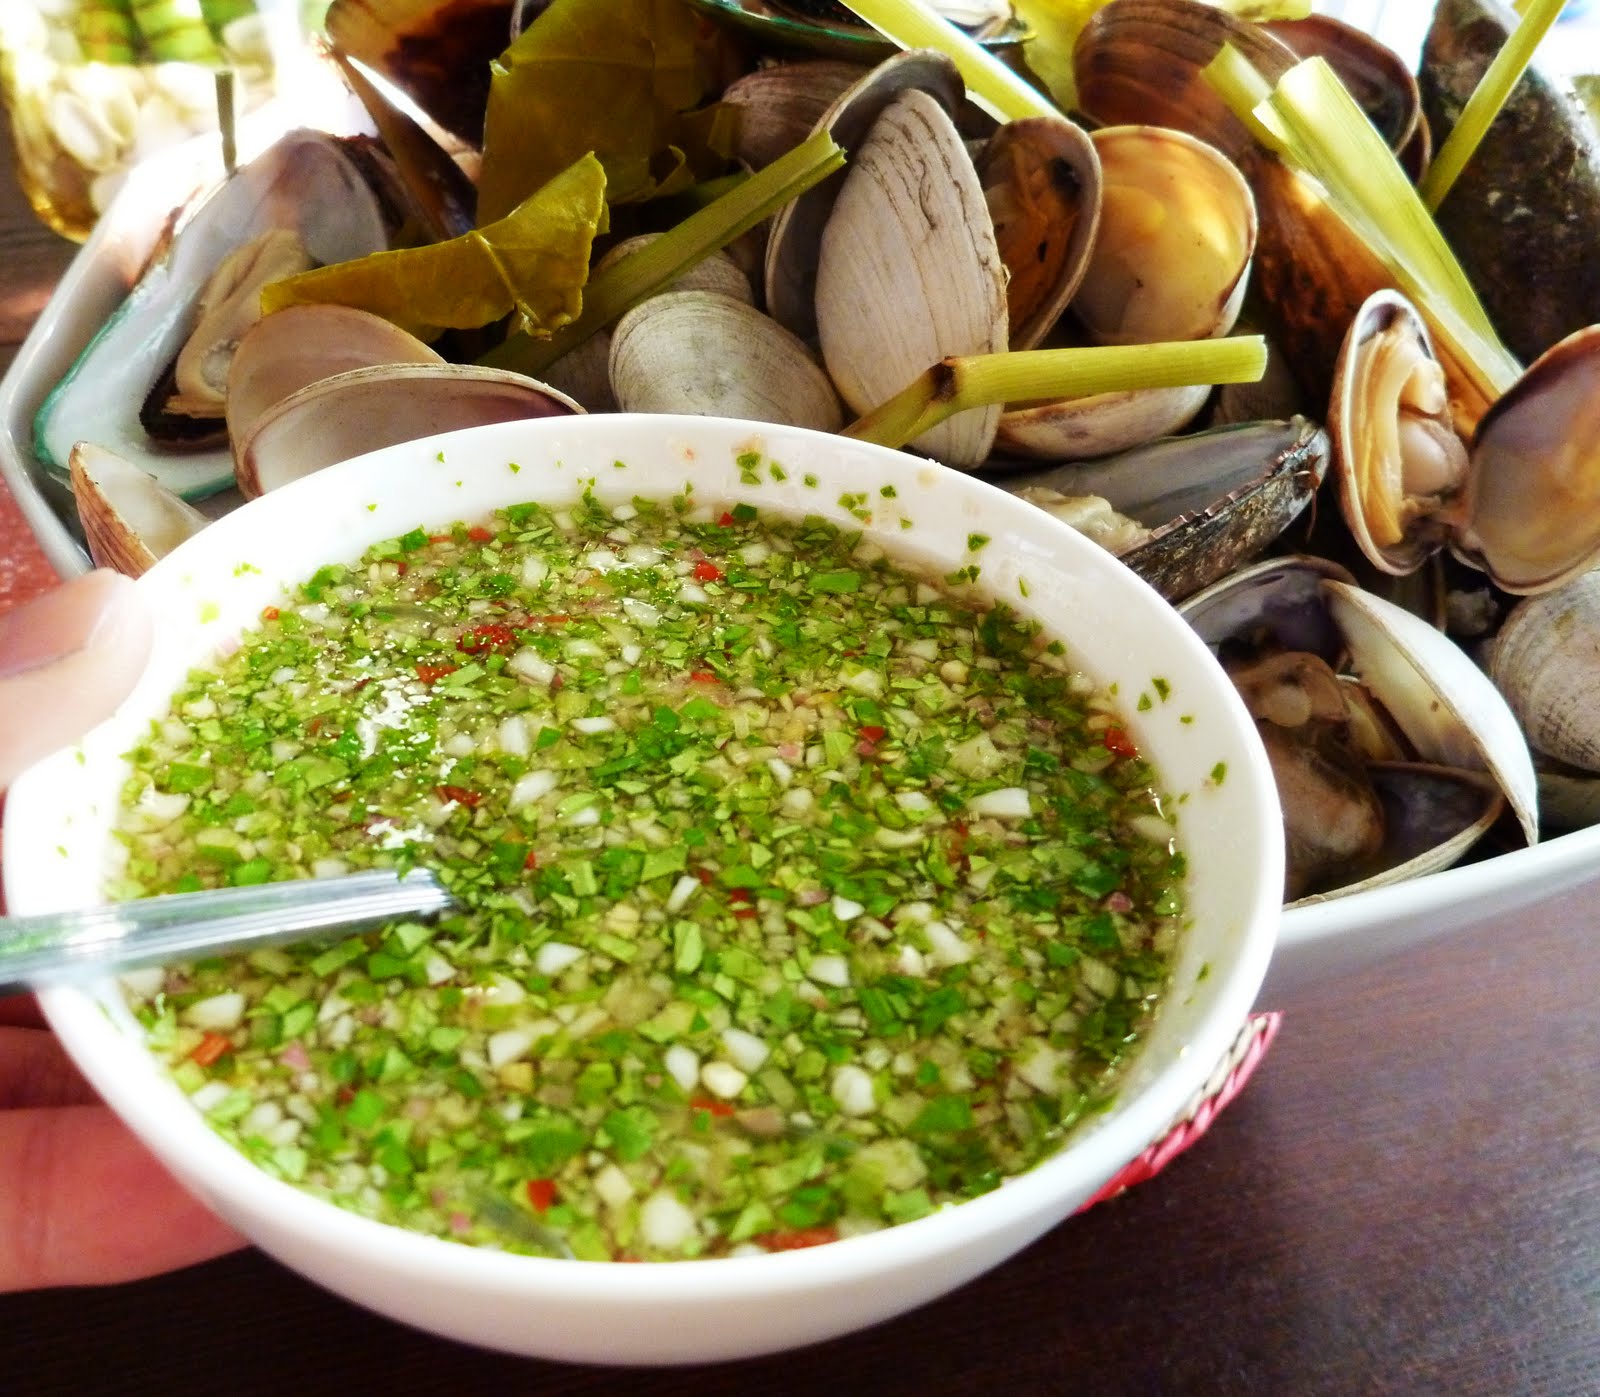
Chem Chép và Hến Nấu Xã với Lá Chanh (Boiled Mussels and Clams with Lemon Grass and Lime Leaves)


This year, we celebrated Father's Day with a barbecue. Obviously, most of barbecue dishes were seafood as my husband is a seafood fanatic.  I love preparing food with our homegrown organic vegetables and herbs; so Steamed Mussels and Clams with Lemon Grass and Lime Leaves, had to be one of the non-grilled dishes on the table.


The ingredients I used to enhance the flavor of mussels and clams were an array of fresh lime leaves and lemon grass, organically grown from our garden.  What I love about this dish is the unique scent of fresh, grassy-lemon citrus aroma with an earthy undertone. Our lime tree this year produces just a few limes but they are huge, juicy and beautiful.  I picked a handful of leaves to steam in the pot along with the shellfish; separately a  few limes and  tender young leaves were picked  from the tips of the new growth to make the savory dipping sauce.
This recipe is easy and fast to prepare and makes a great appetizer dish.
* * *
*
RECIPE: Chem Chép và Hến Nấu Xã với Lá Chanh

*
Ingredients


For the Boiled Mussels and Clams
1 box of Mussels
2-3 pounds Clams 
3-4 stalls of Lemon Grass, cut into 3 segments, smashed the head of it.
A handfull of Lime or Lemon Leaves

For the Dipping Sauce
1 tablespoon finely chopped Lemon Grass Head
1 tablespoon finely chopped  Tender Young Lime or Lemon Leaves
1 tablespoon finely chopped Garlic
1 teaspoon finely chopped Thai Chili Pepper
2 tablespoons Sugar
1/4 cup Lime Juice
1 tablespoon Fish Sauce
1 tablespoon Mussel and Clam Broth
*
Preparing Mussels 


Thoroughly clean and rinse mussels several times.  Remove mussel's beard by giving the beard a forceful tug with your fingers and pulling it away.  Remove and discard any shells that are open or broken and that do not close when tapped.
*
Preparing Clams -Thoroughly clean clam shells and rinse clams several times.
*
Boiling Mussels and Clams


Bring lime leaves, lemon grass and  a small amount of water just enough to barely cover  lime leaves and lemon grass to boil.  Mussels and Clams only need to be steamed in a tiny amount of water, due to the fact that when they open up during cooking and release their own juice, which makes a tasty broth or sauce. If too much water is used, the flavour of the broth will be diluted making it bland. 

Add mussels and clams and turn off the heat once it starts boiling again.  Mussels need only a few minutes of cooking, so therefore when adding them to other recipes, they should be added at the last moment, in order to prevent over-cooking. Over cooked mussels and clams are quite tasteless and rubbery.
 *
Making Dipping Sauce 


In a small bowl, add all the dipping sauce ingredients. Mix it well.

*
How to eat it?  
Pour a teaspoon of sauce on a mussel or a clam.  Chew it down with a bottle of Smirnof Ice or liquor of choice.

Enjoy!

Wednesday, June 15, 2011

Cây Lá Gai (Gai Plant for Gai Leaf Little Cake)


This morning as we took advantage of the beautiful day and started working on the backyard.  I noticed our Gai plants are growing tall enough to dig them up and send them to my blog fans who's been patiently waiting for this special leaf.  So now is the time to make Bánh Ít Lá Gai


I have received quite a few emails asking for Gai Plants since my last post on Bánh Ít Lá Gai (Gai Leaf  Cake).  Click here for the recipe.    As promised I will send them out once the Gai Plants grow back after a prolonged winter. So now I can fulfill that promise.


Gai plant is easy to grow. You can grow it in full-sun or part sun. In the winter time, gai leaves will change to a black color then fall off the plant. But when spring comes, it will grow back fast. When the gai plants grow tall and produce abundant of leaves, you can pick the leaves to sun-dry. You can then store them to build a supply for your next take at the recipe. 


The gai plants are limited, so I will send them as by order of request.  For those who don't receive it this time, I will definitely send it to you when the gai plants grow tall again in about a month or two.  Once you receive it, you can plant it as is or split them up individually.  These plants spread grow fast and spread everywhere.   We originally got a few small plants bunched as one but we split them up individually and now you can see a bed full of them.  

I will wrap the plant base on the "how to ship plants in the mail" guideline and will send it to you via priority mail (2 days shipping)  with your choice of delivery confirmation or without.  I don't think the shipping cost is that much, (less than $10 I hope) but let me check with the post office and will let you know the exact cost.  In the meantime, please email me your shipping address.  You can pay me back for the shippng fee when you receive your plant.  Since I don't sell the plants, so I set up a Paypal Donate Button instead of Pay Button on my blog, so that  you just need to click the button and send the cost of the shipping to my paypal account. 

Thanks for being patient.

Monday, June 13, 2011

Mì Trộn Ngò và Tôm Cháy (Cilantro Noodle with Ground Shrimp Flakes)


This morning, my husband's cousin invited us over for a barbecue in the afternoon.  Since we couldn't make it, I thought it would be a nice gesture to drop off a dish for them to share.  I wanted to prepare a dish that doesn't require too much time and  save me a trip to the store as my daughter also requested me to cook Bún Bò Huế for her lunch when she comes home from preschool.  So I went through my pantry and found a bag of spaghetti, a bottle of sweet chili sauce.  I got plenty of cilantro and spring onion in my vegetable garden and lots of dried shrimps which I always stock up in my fridge.

Cilantro Noodle with Ground Shrimp Flakes  is simple to prepare and deliciously seasoned.  It would make a nice dish for a spring or summer party.  I'm fond of the toasted dried shrimp aroma; the scent of sesame seed oil, the freshness and earthy fragrance of cilantro, the tartness of lime juice and the smeltly fish sauce that can't be missed in Vietnamese cuisine all fused well together; We will need the sweetness of palm sugar to balances out the salty flavor of fish sauce.  In the end all of these ingredients blend to make this dish  simply irresitible.  This can be served as a cold dish. 

But if dried shrimp is not your cup of tea, you can substitute it with fresh shrimps or cubes or slices of seared tuna. 
* * *
*
RECIPE: Mì Trộn Ngò và Tôm Khô Cháy

*
Ingredients


1  bag, about 2 lbs Spaghetti or Dried Thin Wheat Noodle
1 cup Dried Shrimps or 2 cups Fresh Shrimps
3 cups finely chopped fresh Cilantro
1 cup finely chopped Spring Onion
1 Lime, cut into wedges, for garnish
For the Sauce
8 cloves of Garlic, finely chopped
1/3 cup good Fish Sauce
1/2 cup Sweeten Chili Sauce
1/2 cup  Lime Juice
6 tablespoons  grated Palm Sugar
2 tablespoons Sesame Seed Oil
*
Preparing Spaghetti


Bring a large pot of water to boil with a lid on to allow the water to heat up more quickly.  When water comes to a rolling boil, remove lid and add about half of  tablespoon salt to the water.  Add the spaghetti to the boiling water.  Let the spaghetti to cook for approximately 10 minutes, occasionally stirring it to keep it from sticking to the bottom of the pot. Occasionally check the spaghetti to see if it's done. When the pasta reaches al dente, it will be firm in the middle but chewy.  Pour the spaghetti pot into the colander to drain the liquid.  Add about a tablespoon of sesame oil to the spaghetti and toss.  Set it aside.

*
Preparing Sauce


Mix all the sauce ingredients until palm sugar dissovled.  Set it aside.

*
Prepare Dried Shrimp Flake


Soak dried shrimps in warm or hot water for about 10 minutes.  Wash and drain. Place it in a food processor and process it until finely ground.  If used fresh shrimps, peel and devein shrimps, steam then process it until finely ground.  Transfer shrimp to a pan and toast it for a few minutes until the fragnance is released . Set it aside.
*
Presentation

Put aside  some dried shrimp flakes, spring onion and cilantro to garnish it.  Toss spaghetti with the remaining of sauce, dried shrimp flakes, spring onion, cilantro together.  Garnish with dried shrimp flakes, spring onion and cilantro.  Served with  lime wedges on the side for those who prefer a little more tart. Now you have a noodle dish that pairs well with a glass of chardonnay or a glass of milk oolong on a hot summer day!

Monday, June 6, 2011

Nem chua Ham (Pickled Ham)


A friend brought this delicious, addicting Nem Chua Ham to the past Tet (Lunar New Year) dinner that I hosted. It was a big hit. Unlike the traditional Nem Chua which is made of raw pork or beef, this Nem Chua is made out of cooked Ham so everyone including my pregnant friends could also indulge.

My friend was kind enough to pass down his mother's invention of Nem Chua Ham's recipe . I was invited to his house to experiment first hand in his kitchen. As we were making Nem Chua, he recalled how his mother used to forced all of his brothers and himself to help her in the kitchen when they were young. His mother is an excellent cook and love to display her passion. Everyday, she would prepare three typical Vietnamese meals for breakfast, lunch and dinner. During Tet, she would make hundreds of Nem Chua Ham and pass them out to all the relatives and friends. Thanks to her, I inherited a delicious recipe to share with family, friends, and blog fans.

As you may have guessed I came home and started experimenting and quantifying the ingredients for my blog fans since my friend and I cook by guestimation. The outcome turned out well except that it's less sour compare to my friend's Nem Chua Ham; I thought it tasted great but my husband prefered it a little bit more sour. Here is the recipe for you to try out.
* * *
*
RECIPE: Nem Chua Ham
Make 80 rolls
*
Ingredients

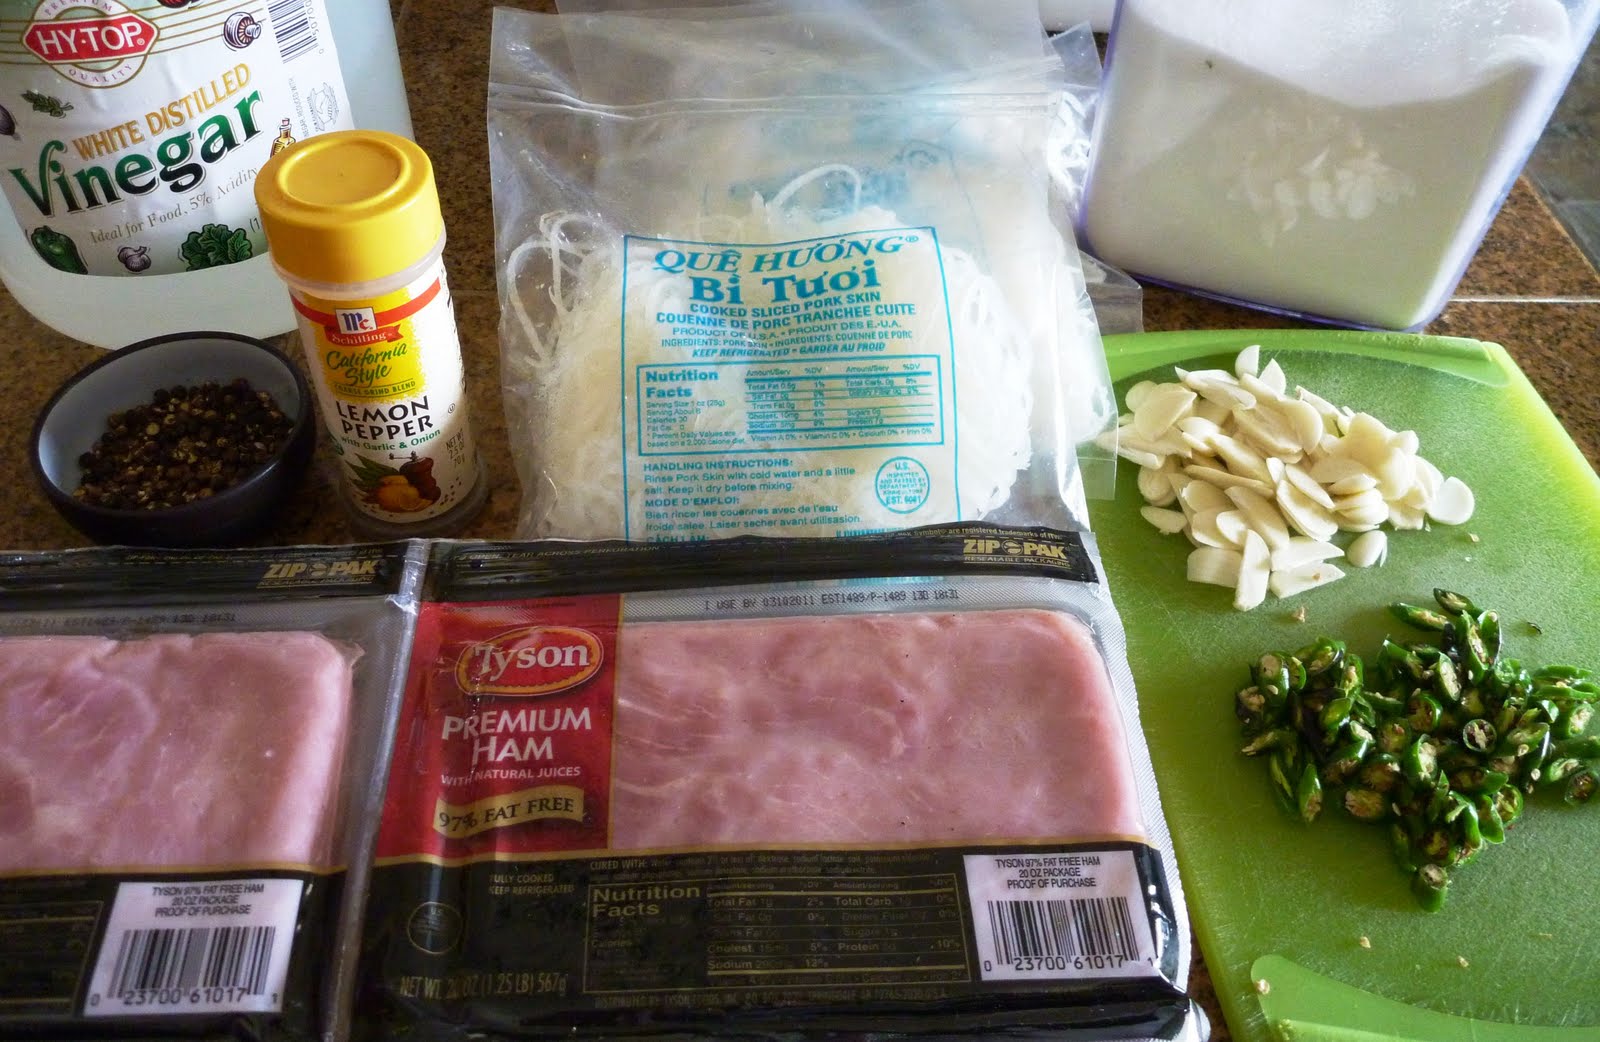
3 cups Vinegar
2 cups Sugar
1 bag Ham (available at Costco)
3 bags Pork Skin
1/2 - 1 tablespoon Fresh Cracked Pepper or Pure Ground Black Pepper
4 tablespoons Mixture Vinegar*
1 - 1 1/2 tablespoons Lemon Pepper
a few fresh  Thai Chili Peppers, thinly sliced
a few cloves of Garlic, thinly sliced
Foil Wrap
Plastic Wrap
*
Soaking Ham

In a large bowl, soak ham in the mixture of vinegar and sugar for about two hours.
*
Preparing Pork Skin

Wash and rinse pork skin for a few time with warm water. Drain it well.
Add 4 tablespoons of mixture vinegar from the ham bowl, fresh cracked pepper and lemon pepper to pork skin and mix it well.
*
Making Ham Pickled

Place a piece of plastic wrap on a clean cutting board or a flat plate. Then place a slice of ham on the plastic wrap. Sprinkle some fresh ground pepper. Place pork skin on the ham then roll it up tightly.


Add a few slices chili pepper and garlic.  I think it looks more appetizing if I use red chili pepper. 


Roll everything in the plastic wrap and twist the two ends tightly to close.


Wrap it with a piece of foil wrap to complete it.
Store these Pickled Ham in fridge for a day to allow flavors to blend and develop before serving.
These Pickled Ham can be kept in the fridge for a few weeks.

I didn't do a good job on twisting the two ends tightly together to achieve good closure as you can see that the ends are protruding. 
*
Have fun and Enjoy!

Thursday, June 2, 2011

Chè Trôi Nước ̣(Vietnamese Glutinous Rice Balls with Ginger Syrup Dessert)


My mother used to cook a lot until her health halted her cooking passion. One of the recipes I learned from my mother is Chè Trôi Nước. My family and my husband love this chè. They wouldn't buy this anywhere but would only request my mom to make it. Once in a while, my husband craves for it and would ask, "Can you make me Chè Trôi Nước just the way mom makes it?".

The glutinous rice balls my mother makes is exquisitely tender and doesn't carry the smell of the old flour. Her filling is packed with flavors; it's fused with pepper, salt and the wonderful aroma of fried shallot mixed with mashed mung beans, and the sweet, ginger flavor syrup that is made with white sugar which I much prefer over brown sugar syrup. My mother loved to cook and bake in large quantity; then she would pack them up in  small portions to share with everyone she knows in her neighborhood. Like mother like daughter, I found myself and my daughters doing the exact same thing.  They often asked me to cook for their friends and teachers.


A few months back, I experimented Chè Trôi Nước with three flavors.  Instead of using just water mix in with glutinous rice flour to make the dough, I used fresh carrot juice to produce carrot dough, fresh spinach juice to create spinach dough,  and cooked taro paste to create a taro dough.   I also experimented Chè Trôi Nước Bột Báng - Tapioca Pearls Balls with Ginger Syrup Dessert.  As for this one, instead of using glutinous rice flour to make dough, I used only Tapioca Pearls.  For those who like tapioca pearls, this dessert will delight your palate. 

*
RECIPE: Chè Trôi Nước
Make 34 Mung Bean Mochi Balls

*
Ingredients


For Dough
2 bags of Glutinous Rice Flour (Bột Nếp)
6-7 cups Water

For Mung Bean Filling
1 bag (16oz) Peeled and Split Mung Bean (about 1 1/2 cups)
1 teaspoon Salt
2 1/2 cups Water
1/2 teaspoon Ground Pepper
1/3 cup Fried Shallot (about 3 shallots)
1 tablespoon Oil from Frying Shallot

For Ginger Syrup
3 cups Sugar
Fresh Ginger, peeled and julienned into small strips, make 5 tabelspoons of ginger
10 cups Water

Accompaniments


1/4 cup Roasted Sesame Seeds

For Coconut Sauce
Click here for Coconut Sauce Recipe

*
Directions

Making Dough


Place a double layers of good paper towel on top of the colander. In a large bowl, place a small rice bowl inside it. Then place the colander on top of the large bowl. Pour glutinous rice flour into a colander.  
Add 1 cup of water at a time into the flour. Use a spoon to mix it until the water mixed well with flour. Cover the colander and let the water drips into the large bowl for about a couple of hours or until flour is not liquidy. Remove the paper towel. Use another paper tower to blot the dough to remove any remaining water on it. 


Kneed the dough for a few minutes to keep the dough together.


Divide the dough into 34 balls. Leave some dough behind to make mini balls without filling.

*
Cooking Mung Bean 


Soak mung beans overnight so it is quicker to cook them but this step is optional. Rinse and drain the beans. In a pot, add mung bean and water then bring it to boil.  Reduce the heat to low, stir it and cook with lid on for about 15 minutes or until soft. Mash it and cook for another 5 minutes. 


Add the remaining ingredients to the mung beans pot. Mix it well. Divide beans paste into 34 balls equally to the dough balls.

*
Cooking Ginger Syrup 


In a pot add in the water, sugar and ginger. Boil until sugar dissolved. Reduce the heat to low.
*
Cooking Gluinous Rice Balls


Bring a pot of water to boil. As you're making each ball (see below "Assembling Mung Bean Balls Together"), drop it into the boiling pot.


The rice ball is done when it floats. Remove it and drop in the simmering ginger syrup pot. Keep the syrup pot on low heat so that the syrup absorbs into the rice balls as this will make the it tastes better.
Assembling Mung Bean Balls Together


Flatten the dough ball and add in the mung bean paste ball. 


Wrap it up and make a round ball in circular motion with your palms. Repeat for the rest of 36 dough balls. Use the remaining dough ball make it into mini balls without the filling.

  *
Presentation


Place the rice ball and the syrup into a dessert bowl. Drizzle coconut sauce over and top it off with a sprinkle of roasted sesame seeds.  Enjoy!!!