Vietspices Search

Sunday, April 27, 2014

Lễ Phục Sinh! (Happy Easter!)


I hope everyone had a wonderful Easter!  
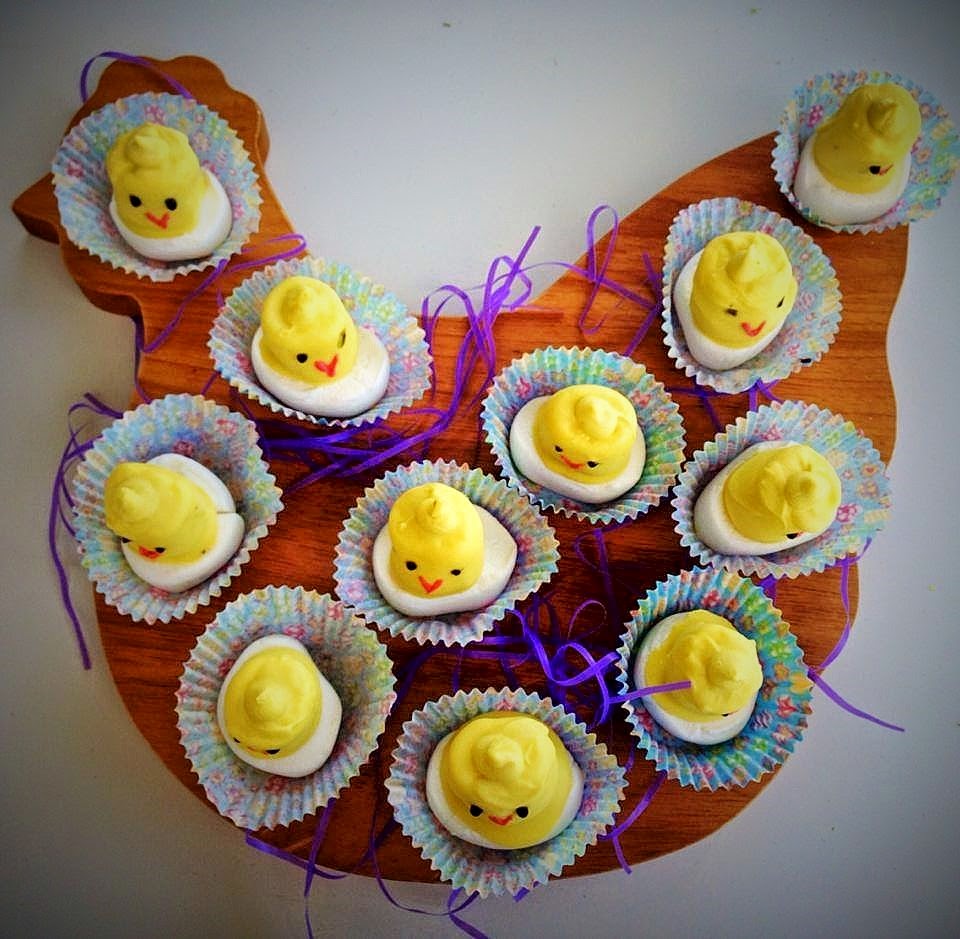
I had a beautiful day with friends and family.  My college roommate's family drove all the way from Yorba Linda to spend time with us for the weekend.  In the bright early morning of Easter, we started with a fun sweet treat project for our kids.  We ended up with cute little yellow peeps made out of marshmallows, chocolate and food colors.  


While the kids were busy doing their own thing, we secretly set up a surprise table for them. They were thrilled to receive the cuddly, cooling and huge-able heating thermal aid zoo characters from the Easter bunny. Their new favorite pets' names are Tiny, Bella, Jojo, and Olive.


Our morning rolled by quickly and by the time we got back from dim sum, it was almost three o'clock.  Since we promised the kids an Easter party, off to the kitchen we go.  With the help of my new "adult" sous chef,  we were able to get a few more treats done in just about an hour.  
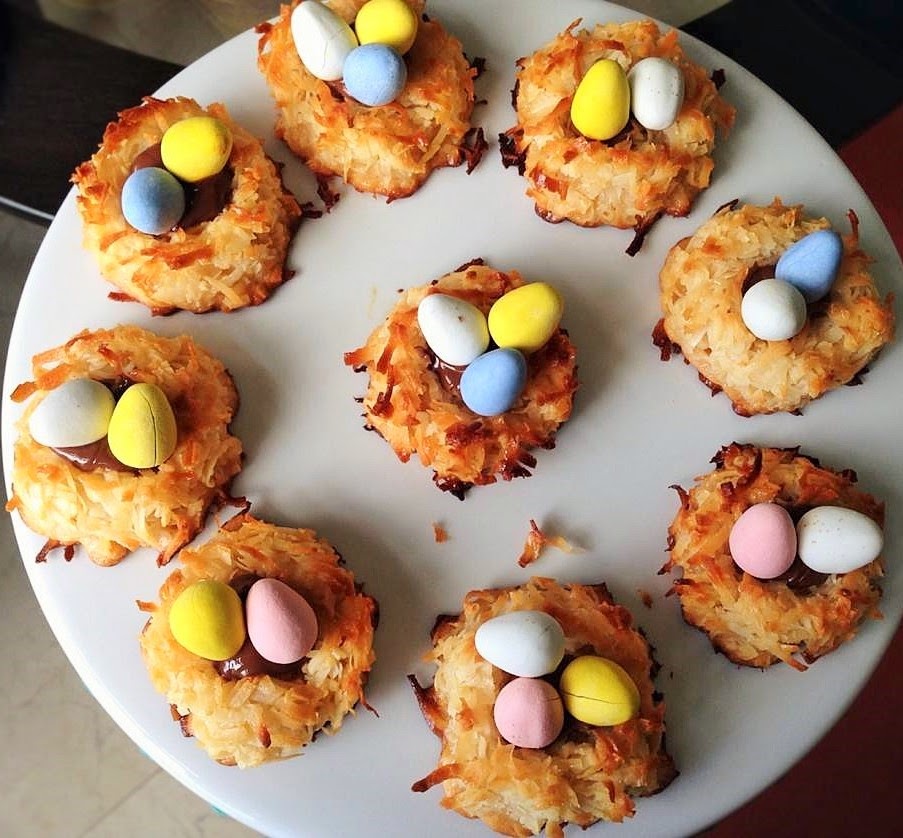
The coconut macaroon nest is a simple recipe but the result was spectacularly decadent.


The rice crispy Easter eggs were not only cute but mighty tasty. Even the adults love them.


The kiddos challenged me to carve a bunny watermelon.  Voila!


I had a couple more treats in mind, but no more time so it was time to set up the sweet treat table.


My sous chef for the day was incredibly creative. She decorated the egg shells with wild garden flowers and leaves that she picked from the backyard. So vibrant and beautiful!


The table was set, the treats arranged and off they go hunting for Easter eggs.


Both parents and children had a great time playing sack racing game, and munching on sweet treats.  


my wonderful sous chef for the day

It was a perfect Easter day as the weather was gorgeous.  We closed our day with a delicious barbecue dinner.


And to top it off, we also enjoyed the delish homemade pate that was delivered to me in the morning of Easter from one of my blog readers from San Francisco.  It was so good that everyone begged for the recipe.


And for dessert, a super rich and yummy chocolate cake was served to our delight. It was also delivered from the same person. In case you read this post, thank you so much for the amazing food and your thoughtfulness! We thoroughly enjoyed every morsel.


Until next Easter, may you and your family be blessed!

Thursday, April 24, 2014

Thịt Heo Quay (Roast Pork)


Within a month, I have made thit heo quay (roast pork) 4 times! You would think I would have gained a ton of weight from consuming all these food, right? The truth is I've actually lost weight because I was so consumed with my recipes that I would sacrifice my meals. Well, at least the sacrifice pays off.

So after 4 experiments on the roast pork, I finally achieved the crispiness and flavor that I wanted by using various methods utilizing lime juice, vinegar, and sea salt. Additionally, I have figured out a way to eliminate the smoky, porky smell of roast pork from lingering all over the house.


Thịt Heo Quay might look hard to roast but after a few tries, it's duck soup. For me the most exciting part of roasting the pork is anxiously waiting to hear the sound of the pork skin crackling out loud like fire crackers toward the end of the roasting process. The minute I hear it pops my heart is filled with the joy, and I know my family doesn't have to eat tough chewy roast pork that day. 

Now,  it's your turn to have some fun and try out the recipe. Hope your first time is a charm!
***
*
RECIPE: ROAST PORK
*
Ingredients


1 piece (2-3 pounds) Pork Belly, with or without bone-on 

for the Meat
2 teaspoons Salt
2 teaspoons Five Spices
1 teaspoon Black Pepper
3 teaspoons Sugar
2-3 cloves of Garlic

for the Skin
Kosher Sea Salt (very inexpenvise at Asian markets)
2 teaspoons Vinegar or Lime Juice
1 teaspoon Salt
*
Directions
*
Preparing Pork


Use a knife to scrape the pork's skin thoroughly to eliminate the odor on the skin. Use a tweezer to remove hair on the pork skin if any. Rinse and pat-dry.
*
Marinating Meat


Smash garlic with a pestle then combine all dried ingredients and mix well.  Rub it all over the top and sides of the meat but NOT the skin.


If you have a big piece of meat, cut the meat about 1/2 inch deep into small sections then rub the dried ingredients all over it  This way the meat will absorb the seasoning quickly.


Flip the meat over with the skin face up. Use a piece of paper towel to pat the surface very dry.


Place the meat in the fridge for at least 4 hours or over night to marinate it. DO NOT cover the meat with plastic wrap as the moisture will collect on the plastic wrap and wet the skin.
*
Preparing the Pork Skin


At this point, preheat oven to 395 F or 200 degrees Celsius.

Remove pork from the fridge. Prick the skin all over with a sharp fork or a skewer but try not to prick too deep that it disrupts the fat layer under the skin. This will cause the fat to release during baking and will wet the skin.


Place pork on a big piece of foil wrap and fold it up like a boat. This method is to keep the meat from being dried and burnt; it also holds off the layer of salt. Last but not least, it prevents the fat from splattering all over the oven.


Make sure the pork skin is dried. Use a paper towel to pat dry it if needed. Use a brush or your fingers to massage vinegar or lime juice all over the skin.


Method #1: Cover the pork skin with a layer of sea salt will help reduce the smoky pork odor. This method comes from ancient Chinese recipe to trap heat and moisture under an airtight crust, forcing seasoning to permeate the food rather than allowing them to escape.


Method #2: You can eliminate the layer of sea salt step but make sure to mix 2 teaspoons of vinegar/lime juice with 1 teaspoon of salt then brush or your fingers to massage  over the skin.
*
Roasting the Pork


Place the pork boat on a tray and roast it in the middle rack of the oven for about 50-60 minutes depends on the size of the pork.


Remove the pork tray from the oven.  Remove the foil wrap to make it easier to scrape off the layer of salt. Discard all the salt.


Put meat back on the rack with a tray on the bottom to catch the dripping fat. Switch the heat to broil, and broil on medium heat (my oven has broil number setting at 1 low to 3 high) for another 10-15 minutes until the skin is crackling and puffing evenly.


If you use method #2 which is without applying a layer of salt, keep the meat in the foil boat while broiling to catch the dripping fat.


If there is an area that hasn't cracked and puffed yet, cover the finished part with foil wrap to prevent it from burning and continue roasting . 


Once done, remove from the oven and let it rest for 10 minutes before cutting with the skin facing up.

If there are any burnt parts of the skin, use a knife to scrape it off. 


*
Presentation


Chop roasted pork into small bite size pieces.  Serve with steamed rice or enjoy it with bánh hỏi (fine rice noodle cake), lots of herb and lettuces.


Ăn Ngon!

Friday, April 18, 2014

Kem Flan (Crème Caramel)


It has been flan fever in my kitchen since I got this new recipe. Thanks to Ha V who visited me recently.  After a big lunch, I served her my flan. She then shared a favorite of hers and said that everyone who's ever had it, loved it; she was not over-exaggerating. I like my original flan recipe but this one is even better.  The texture is silky smooth.  Even my girls agreed.  They were asking for more.  Though I did make some minor changes to the recipe for my own taste,  I am sure it wouldn't have made a difference.  

Flan is served cold and back in the old days - at least in Pleiku where I grew up - I recalled that flan was served with shaved ice to keep it cold.  Flan is delicate and decadent; it's usually served as a small and round cut.  I like to garnish flan with fruits such as blueberries, raspberries and strawberries to not only balance the flavor and sweetness of the caramel sauce, but also to bring out its beauty.
***
*
RECIPE: FLAN
*
*
Ingredients
make 7-8 flans


400 ml Milk (1 3/4 cups)
300 ml Heavy Whipping Creme (1 1/4 cups)
5 Egg Yolks
1 whole Egg
1/4 teaspoon Vanilla Powder
6 tablespoons Sugar

For Caramel Sauce
1/2 cup Sugar
1 tablespoon Espresso, optional
*
Directions


Turn oven to 350 degree.  Make a water bath for flan by placing a baking tray in the middle rack of the oven and add boiling hot water to 2/3 of the tray.  
*
Making Caramel Sauce


Cook sugar in a sauce pan over a moderate heat. Watch the sugar closely as it heats. As the sugar begins to melt and turn from a clear liquid to a golden brown color around the edges, use a spatula move the liquefied sugar gently from the edges of the saucepan to the center. Be careful not to over stir the caramel-the sugar may start to clump up before it has a chance to melt. Caramel is done when it is just past the smoking point, and it has a deep amber color. At this point, turn off the heat and add the espresso if you like the taste of it.


Immediately, spoon a couple teaspoons of caramel sauce into each ramekin.  Set aside.

Click here to buy ramekins.

*
Preparing Eggs


In a bowl, add eggs and gently mix until it's well blended.  Set aside.
*
Preparing Milk Mixture


In a pot combine milk, heavy whipping cream and sugar and cook until the milk mixture is warm and sugar is dissolved.


Turn off heat and let it cool down.  You might want to transfer it to another bowl to speed up the cooling process.  
*
Preparing Flan Mixture


Once the milk mixture is cooled down, add eggs and vanilla powder. Gently mix until blended.

Use a strainer to strain the mixture to remove any egg shell or tiny pieces of egg white.


Pour mixture into ramekins.

*
Baking Flan


Arrange the ramekins in the hot water bath.  Place a piece of foil loosely on top of the flan tray to prevent flan from burning.

Bake for about 50 minutes, depends on your oven and the size of the ramekin.  The flan is ready to be removed from the oven when the edges are set. Gently shake the ramekin, the center of the custard should jiggle slightly. You can also insert the tip of a toothpick into the custard near the center. If the flan is still liquid, it needs more time in the oven.  Remove from the water bath and let them cool down.

*
Presentation


Keep flans cold in the fridge until serving.  Refrigerating the flan overnight is best.  When ready to eat, use a knife to loosen the edge by going around the ramekin before flipping it onto a plate.

Serve by it self or with a scoop of shaved ice placed on top of the flan.


As an extra, you can also add a half teaspoon of fresh coffee or espresso onto the flan for a more complex flavor.  

Bon Appeite!