Vietspices Search

Monday, March 22, 2010

Gỏi Đu Đủ Khô Bò Gan Cháy (Vietnamese Papaya Salad with Beef Jerky and Liver Jerky)


* * *
*
I was busy preparing for my second daughter's birthday and didn't have time to post any new entry recently.   I am always excited when my two darlings's birthdays come around.  
I always like to spoil them and give them memorable birthday parties as life can be full of surprises and who knows what tomorrow will bring, so why not make the best of everything for my children when I can, especially when they're at such an adorable age. On March 11th, my youngest daughter turned 2. As always, everyone in my family  are involved in preparing for the birthday party. My husband hung up the garlands, Grandma  prepared the balloons, and I had the best job . . . deciding what food to serve. 


 You can see from the pictures that the party was a success and my daughter had a blast as evident by her beautiful smile throughout the party. We had plenty of food and the guests really like the variety.

Click to play this Smilebox slideshow:
Create your own slideshow - Powered by Smilebox
A photo slideshow by Smilebox


One of the dishes I  made for the party was Papaya Salad with Beef Jerky, an appetizer favorite. My husband would love to sit out by his koi pond with the sun beating on his face and munch on this dish with a bottle of cold beer. A friend was at the party and requested me to post the recipe on my blog, so here it is.  I bought the soft and sweet beef and liver jerky  from Vua Khô Bò store (translated The King of Beef Jerky) in Westminster, Orange County.  I can't find these types of beef and liver jerky here in Sacramento, so whenever I have a chance to go to Cal So, I would buy some to bring home. 

RECIPE: Green Papaya Salad with Beef and Liver Jerky

Ingredients
*
Preparing Dressing


1/2 cup Hoisin Sauce
2 tablespoons Soy Sauce 
3 tablespoons Rice Vinegar or Regular Vinegar
1 cup Hot Water
4 tablespoons of Sugar
4 cloves of garlic, thinly sliced
1/2-1 teaspoon Paprika, optional
Sriracha Hot Chili Sauce, optional 

In a large bowl, stir sugar in hot water until dissolved.  Add the remaining ingredients except Sriracha hot chili sauce into the sugar mixture and mix it well.  It's best to leave the sauce overnight so that the garlic releases even more flavor. Discard the garlic before serving. 

Adding paprika is an option
*
Preparing Papaya
1 Green Papaya (pick a long one without any soft spots on it.  It's easier to hold on the long papaya while shredding it)
3 teaspoons of salt
About 1/2 pound of  shredded or whole Asian-style  soft and sweet Beef Jerky, use a scissor  to cut into about 1 1/2 cup strips
About 1/4 pound of Liver Jerky,  use a scissor  to cut into about 1 1/2 cup strips, optional
1/4 cup shredded fresh Thai Basil Leaves

Peeled the green papaya with a vegetable peeler, cut them in half and discard the seeds.  Cut each half lengthwise into quarters.   Using a slicer to shred the papaya pieces.
Got this Kitchen Aid Slicer from Bed Bath and Beyond

Put the shredded papaya in a colander, add salt, and use both hands to mix it up and massage it thoroughly to release the slime from papaya.   Let  sit in a colander for about 15 minutes.   Rinse it under cold running water to remove the salt  then  squeeze out the excess moisture with a few  full hands of shredded papaya.  Make sure you extract enough water from papaya without completely crushing it.  

Transfer papaya to a large plate.  Add  some Thai basil  and mix them up.  Garnish the top of papaya with shredded  beef jerky, liver jerkey and a few of Thai basil leaves.   Serve the dressing on the side and have guests dress their own salad.  For those who can toterate spicy, drizzle some Sriracha hot chili sauce over your dish.


Enjoy!

Wednesday, March 17, 2010

Bánh Củ Cải Trắng (Daikon Radish Cake)


One of my favorite food bloggers is Andrea Nguyen.  She is a writer, a cooking teacher and the author of Into the Vietnamese Kitchen and  her recent  cookbook Asian Dumplings which was just published in September 2009.  I knew of her since the last couple years when I was in the middle of making Gỏi Đu Đủ Khô Bò Gan Cháy (Papaya Salad with Beef and Liver Jerky) and my  Beef didn't turn out like Beef Jerky at all.  So I searched the web to find the secret to making beef jerky, but I didn't find what I was looking for.  Subsequently, I discovered Andrea's blog, so I decided to email and ask her instead.  Surprisely, I received her reply immediately.  She's very good at answering anyone's questions and that make her a great cooking teacher, in my opinion.   Since then, we comunicated through emails; I followed her through her blogs and facebook.  I wanted to thank her for all her great recipes that she shared with everyone through her blogs so  I sent her a bag of our homegrown chili peppers.  I didn't expect it but she spent her time writing about it and posting pictures of my gift and my vegetable garden.  That was very thoughtful of her.  

So this post is really about one of my favorite dishes that I learned from her; it's Andrea Nguyen's delicious Daikon Radish Cake recipe.  I followed her recipe and only adjusted a little bit such as increasing the amount of lap xuong (chinese sausages) and dried shrimps.  I also prefer spicy vinegar soy sauce dip over oyster sauce or plain soy sauce.  I am sure her original recipe is great but I changed it a little bit to my liking.  The Daikon Radish Cake turned out beautifully and deliciously.  This Daikon Radish Cake tastes so good when it's still hot and crispy.  Just dip it in the spicy vinager soy sauce or your favorite sauce and and enjoy. Yummy!
* * *
*
RECIPE:  Bánh Củ Cải Trắng (Daikon Radish Cake)
Luo Bo Gao
Serves 6 to 8 (makes 2 dumplings)
*
Luo bo gao is a dim sum dish made with daikon, or winter radish. Daikon is juicy like an apple, shaped like a large, white carrot, and has a smooth radish flavor. To make the batter for luo bo gao you need to cook the daikon, break it down, and mellow out its flavor while concentrating its essence. You can eat this fresh from the steamer, but it’s most popular sliced and lightly seared for a crispy skin.
 *
For the Dumplings
2 cups white rice flour, preferably from China or Thailand
¼ cup wheat starch
1 teaspoon salt
½ teaspoon freshly ground white pepper
10 to 12 small or medium dried shrimp, soaked in hot water to cover for 30 minutes
1 pound daikon radish
1 link Chinese pork sausage (la chang), chopped very fine (about ⅔ cup)
3 scallions, chopped fine

I used 2 chinese sausages and about 20 of medium dried shrimps

For Cooking and Serving
(I used vinegar soy sauce with hot sauce)
Grapeseed or other neutral oil to coat the cake pans and the skillet
Oyster sauce or hot sauce

Equipment
(I used my steamer and 1 square cake pan)
2-inch-high steamer rack
Two 9-inch round cake pans
Pot large enough to hold both the rack and the cake pan when covered
*
1. Make the Batter: Combine the rice flour, wheat starch, salt, and pepper in a large bowl and set aside. Drain and finely chop the shrimp.

2. Peel the daikon and grate it through the small holes of your grater onto a kitchen towel. Bring together the ends of the cloth and twist to squeeze out as much of the liquid as you can into the bowl. Measure out the collected juices and add enough water to the juice to make 3½ cups.
My cooking assistant is my Mother-In-Law who is a great helper.
She used her hand to squeeze out the liquid instead using the kitchen towel. Three balls of daikon you see in the picture are 3 pounds of daikon after 
grated and squeezed out the liquid

3. Pour the daikon liquid into a medium pot. Add the grated daikon and bring to a boil over high heat. Cover, reduce the heat to low, and simmer for 5 minutes. Mix in the sausage, scallions, and chopped shrimp, cover, and cook for 5 minutes longer. Remove from the heat. Slowly add the rice flour mixture and whisk continuously until free of most large lumps. The batter will be thick and sticky and a little lumpy.

4. Steam the Dumplings: Place the steamer rack in the pot, add 1½ inches of water to the pot, and bring to a boil over high heat.

5. Brush both cake pans with a little oil and divide the batter between the 2 pans. Dip a spoon into cool water and use the back of the spoon to smooth out the surface of the batter.

6. Carefully place one of the filled pans on the steamer rack, cover, and steam for 40 minutes. The other filled pan should be covered and left sitting at room temperature while the first one cooks, or it can be cooked simultaneously in another pot.


7. Remove the pot from the heat. Carefully lift the pan out of the pot, place it on a folded kitchen towel, and allow the luo bo gao to cool to room temperature. Cook the other filled cake pan.

8. Unmold the luo bo gao and gently turn it onto a cutting board. Cut each dumpling into 8 equal slices. (Do not slice the luo bo gao if you are planning on serving it later. They can be refrigerated, tightly wrapped, for up to 3 days.
Slice and fry just before serving.)

9. When ready to serve, coat a large skillet with oil and heat over medium heat. Carefully place the slices of luo bo gao in the pan and cook until their bottoms are crispy and golden brown, about 4 minutes. Turn them over to brown the other sides. Serve with a side of oyster sauce or hot sauce.


Saturday, March 6, 2010

Chicken Pot Pie


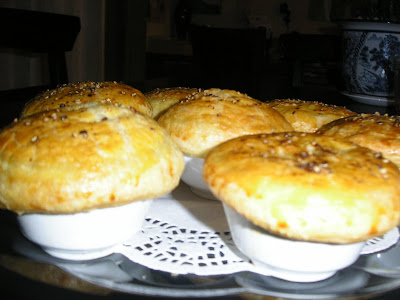
During last Christmas, I had an opportunity to make treats for my husband's coworkers.  Since I had lots of puff pastries in the fridge, I decided to make Chicken Pot Pies.  After googling for the best Chicken Pot Pie recipe, Ina Garten's five stars rating with over 400 user's reviews recipe was the overwhelming favorite.  I was eager to try her Chicken Pot Pie recipe and the result was quite tasty.


My husband's coworkers enjoyed them tremendously. One of them even wrote a note saying that it's the best chicken pot pie she's ever had. Today, while I was looking through my food pictures, the Chicken Pot Pies I made still looked so good (thanks to Ina Garten's recipe). So I thought I would share this with my blog readers.   Below is Ina Garten's best Chicken Pot Pie recipe.  Hope you enjoy it as much as I do.
* * *
*
RECIPES: Chicken Pot Pie
*
Ingredients

3 whole (6 split) chicken breasts, bone-in, skin-on
3 tablespoons olive oil
Kosher salt
Freshly ground black pepper
5 cups chicken stock, preferably homemade (I used canned chicken broth)
2 chicken bouillon cubes
12 tablespoons (1 1/2 sticks) unsalted butter
2 cups yellow onions, chopped (2 onions)
3/4 cup all-purpose flour
1/4 cup heavy cream
 2 cups medium-diced carrots, blanched for 2 minutes

1 (10-ounce) package frozen peas (2 cups)
1 1/2 cups frozen small whole onions  (I skipped it)
1/2 cup minced fresh parsley leaves
*
For the pastry
(I bought my puff pastry from Cash and Carry, therefore, I didn't have to make it from scratch)

3 cups all-purpose flour
1 1/2 teaspoons kosher salt
1 teaspoon baking powder
1/2 cup vegetable shortening
1/4 pound cold unsalted butter, diced
1/2 to 2/3 cup ice water
1 egg beaten with 1 tablespoon water, for egg wash
Flaked sea salt and cracked black pepper

For the pastry, mix the flour, salt, and baking powder in the bowl of a food processor fitted with a metal blade. Add the shortening and butter and mix quickly with your fingers until each piece is coated with flour. Pulse 10 times, or until the fat is the size of peas. With the motor running, add the ice water; process only enough to moisten the dough and have it just come together. Dump the dough out onto a floured board and knead quickly into a ball. Wrap the dough in plastic and allow it to rest in the refrigerator for 30 minutes.
*
Preparing Chicken

Preheat the oven to 350 degrees F.
Place the chicken breasts on a baking sheet and rub them with olive oil. Sprinkle generously with salt and pepper. Roast for 20 to 25 minutes, or until cooked through. Set aside until cool enough to handle, then remove the meat from the bones and discard the skin. Cut the chicken into large dice. You will have 4 to 6 cups of cubed chicken.
*
Preparing Filling

In a small saucepan, heat the chicken stock and dissolve the bouillon cubes in the stock. In a large pot or Dutch oven, melt the butter and saute the onions over medium-low heat for 10 to 15 minutes, until translucent. Add the flour and cook over low heat, stirring constantly, for 2 minutes. Add the hot chicken stock to the sauce. Simmer over low heat for 1 more minute, stirring, until thick. Add 2 teaspoons salt, 1/2 teaspoon pepper, and heavy cream. Add the cubed chicken, carrots, peas, onions and parsley. Mix well.
Preheat the oven to 375 degrees F.

*
Assembling Pot Pie

Divide the filling equally among 4 ovenproof bowls. Divide the dough into quarters and roll each piece into an 8-inch circle. Brush the outside edges of each bowl with the egg wash, then place the dough on top. Trim the circle to 1/2-inch larger than the top of the bowl. Crimp the dough to fold over the side, pressing it to make it stick. Brush the dough with egg wash and make 3 slits in the top. Sprinkle with sea salt and cracked pepper. Place on a baking sheet and bake for 1 hour, or until the top is golden brown and the filling is bubbling hot.

 
Enjoy!

Thursday, March 4, 2010

Cà Ri Vịt Quay (Roasted Duck Red Curry)


It was lunch time. My daughter and I went to a friend's house for cháo gà (chicken porridge) but instead ended up with a bonus dish of delicious roasted duck red curry over steamed rice.  I personally don't like curry in general but her Roasted Duck Red Curry was so good that I was inspired to replicate the dish  for my family to try, especially for my dear husband who is a curry fanatic.  I plan to make this dish for my youngest daughter's 2nd birthday.  So if  you cannot make the party, below is a recipe for you to enjoy.   

This Roasted Duck Red Curry recipe is very simple to prepare.  You can make a pot of this delicious curry in about 20 minutes.  There are many kinds of vegetable that would go well with curry.  However, yellow curry tends to go well with potatoes, avocados, onions and carrots. 
Red curry pairs well with pumpkin, pineapple, mangos, bell peppers, bamboo shoots, brocolli, carrots, eggplants and tomatoes.  Green curry goes well with bamboo shoots, green beans, eggplants,  bell peppers and carrots.

As for meat, chicken, duck, beef or pork will make great curries. If you like  seafood then prawn, scallop, mussel, grilled salmon and calamari are a great combination.  

The only ingredients missing from my dish and I think they enhance each other's flavor well are sweet mangos, basil and kiffer lime leaves.  I would eliminate bamboo shoots for the mango.  The result was a satisfying  marriage of fruits, vegetables and herbs marinated in the sweet aroma of roasted duck and coconut milk. My mother-in-law enjoyed her bowl with a whole loaf of bread.  Yum!

* * *
*
RECIPE: Roasted Duck Red Curry
*
Ingredients

1 roasted duck, deboned and cut into 1 inch strips (you can find it at most Chinese supermarkets and ask them to chop it into small pieces),
2 cans of 14 oz chicken broth
1 1/2 cans of  13.5 oz  coconut milk (about 3 cups)
1 can red curry paste (use less if you can't toterate spicy curry)
 1-1 1/2 cups of red or yellow  bell pepper (add more if you preferred)1-1 1/2 cups of sweet onion
1-1 1/2  cups of pineapple (add more if you preferred)1 can of precut bambo shoot
1-2 whole riped sweet mango, cut into 1 bite-sized piece (optional)
1 cup of  red tomato, removed seeds, cut into bite-sized cubes (optional)a few kiffer lime leaves, shredded (optional)
2-3 sprigs of basil, use only basil leaves
2-3 tablespoons of fish sauce
*
Preparation
Bring coconut milk, chicken broth, curry paste to a boil. 
Add the rest of the ingredients except basil leaves and stir well.  Taste and adjust to your liking with more fish sauce.  When the curry starts to boil, add basil leaves
and remove it from heat.
* * *

*
Enjoy a bowl of Roasted Duck Curry with steamed rice.  I personally like to eat
it with French bread.  Some people like to eat it with noodles.  To each her own I suppose. Just remember, this is a high calorie, high cholesterol dish so watch your waistline.

Bon Appetit!

Wednesday, March 3, 2010

Bánh Quai Vạc (Vietnamese Pork and Shrimp Dumplings)


Once again, five of us gathered at my humbled kitchen to try our hands at Bánh Quai Vạc. I can see the hunger in the girls' eyes and their hands were writhing with eagerness to kneed that dough. We used 5 bags of flour and made two different fillings: Pork, Shrimp filling and Mung Bean paste filling. While all of us were making dumplings in the kitchen, the kids were in their own world, mostly playing the Wii. After a while, they suddenly became interested in seeing us work. They all gathered around and wanted to help us out. They became our official food critics and the results were encouraging . . . they ate everything. 

While we continue to assemble dumplings, we boiled the first batch to see how our Bánh Quai Vạc would turn out; once done, the kids ate them all. They wanted more, so we cooked another batch to sastify their tummies. I was a bit surprised because I thought the kids wouldn't like this type of banh due to the chewiness of the dumpling skin. 

The hardest part of making Bánh Quai Vạc is making the dough. The water has to be boiling while pouring it into flour. You have to kneed the flour right away and kneed it fast before it dries out. When the dough doesn't stick to your hands and it's soft, it's ready to use. 

Don't worry if your dough doesn't turn out right; it may take several tries so be sure to have plenty of spare flour. If all else fail, you can come to the demo next time :-). Have fun!
***
 *
RECIPE: Bánh Quai Vạc
*
Ingredients

For the Dough
1 bag Banh Bot Loc Flour
1 cup Boiling Water

For the Pork and Shrimps Filling
1/4 pound of  Lean Pork, cut into small cubes
1/4 pound of Shrimp, deveined, cut into 3-4 pieces
1/4 cup of shredded Wood Ear Mushroom, soaked, optional
1 tablespoon Fish Sauce
2 tablespoon Sugar
1 teaspoon Black Pepper
2-3 cloves of Garlic, finely chopped
1 Shallots, finely sliced
1 tablespoon Oil

For the Mung Bean Paste Filling
1/4 bag of Mung Bean (split and peeled ), soaked
1/2 teaspoon of Salt
1/2 teaspoon of Black Pepper
2 teaspoons of Fried Shallots 

For Scallion Oil 
3-4 Spring Onion (hành lá), finely chopped
1 clove of Garlic, sliced
1 tablespoon Oil

For Dried Shrimp, for garnish, optional
1/4 cup of Dried Shrimps
Red Food Color

Fried Shallot, for garnish, optional

For Dipping Fish Sauce
click here for the recipe

*
Directions


Making Scallions Oil 

Heat a tablespoon of oil and garlic in a pan (̣using garlic will add a lot of fragrance to the oil). When garlic is golden brown, turn off the heat.  Add chopped green onion and remove it from heat. Set it aside.
*
Making Dried Shrimp


Soak dried shrimps with warm red color water (add a few drops of red food color into the water). In about 20 minutes, rinse and drain shrimps and grind them in a food processor until they're puffy. Pour it in a pan and fry for about 5 minutes or until dry. 
*
Making Dough


Empty a bag of flour in a mixing bowl. Pour 1 cup of boiling water over the flour. Kneed it with your hand palms until dough doesn't stick to the bowl or your hands. Dough should be warm and soft. Put it in a Ziploc bag to keep it from being dried.
*
Making Pork and Shrimp Filling


Heat oil in a pan, add garlic, shallots and stir until it's golden. Add the remaining ingredients and simmers for about 20-30 minutes. If need it, adjust sugar and salt until the meat tastes sweet and salty. When the sauce becomes thick and coats the pork and shrimp and the color changes to brown, remove from heat.
*
Making Mung Bean Paste Filling


Rinse mung beans a few times.  In a pot, add water about 1/2 inch above the beans and bring to boil. Add more water if necessary. Reduce the heat to low, stir it and cover it with a lid. Cook for about 10 minutes or until soft. Mash it. Add the remaining ingredients to the beans pot and mix them well. Add a little more salt if it's not salty enough. If it's too dry, add a little bit more of hot water.
*
Assembling Dumplings


Make a small ball of dough about a size of a walnut. Use your thumbs and index to press it down to make a flat circle or you can use a dough roller to roll it out into a flat circle . Add some meat or bean paste (not too much or it will burst when you boil it) on the middle of the circle dough. Fold dough over to make a half circle. Press down the edge of the half circle to close it up. Repeat this step until no more dough and filling are gone. 


To make perfect circles, we used circle cookie cutters as you've seen in the picture. I bought a set of 3 cookie cutters at Bed Bath and Beyond for about $4.
*
Cooking Dumplings

Set aside a large bowl of cold or ice water.

Bring a pot of water to boil. While the water is boiling, add raw dumplings in it, lower the heat down to medium high. Boiling water could cause the bánh quai vạc to burst.

When dumplings are floating, wait for about 5 minutes or until dumplings are cooked before removing them with a strainer and pour them into a bowl of cold or ice water. Let them cool down for about 30 seconds, then scoop them up with a strainer and add them in a scallion oil pan.
*
Presentation

Place bánh quai vạc on a plate and top with dried shrimps and fried shallot. Serve bánh quai vạc with dipping fish sauce. 


Enjoy!

Monday, March 1, 2010

Bánh Gai Sữa (Thorn Cookies)

Banh Gai are very common in Vietnam. I remembered everyday before I took off to school, my mom gave me money for snacksThe snack vendors sat right in front of the school gate and patiently waited for students to arrive.   As soon as I got to school, I spent some of that money to buy  snacks.  The remaining money, I saved it to buy more snacks at recess and after school.   I spent a great deal of my snack allowance on Bánh Gai  as it was so common and good. This cookie is named for it's resemblance to thorns on a branch.    

You really need to look closer to see the thorns on these cookies :-)

It's been years since the last time I had them.   I finally made some today for my two daughters to enjoy with some warm green tea.   The cookies had the right taste but the shape wasn't quite what I had hoped for.  And my hands were aching from trying to squeeze the dough out of the pouch.  My banh gai could have had more thorns and looked better if my husband was the one squeezing the dough. On the second batch, I ran out of energy so I removed the star tip to make it easier to squeeze. To make banh gai look like the ones in the top image, you need to use the banh gai tool to the right.  

As you can see from the plate, there are cookies with thorny ridges and those without.  Banh gai is very easy to make but squeezing the dough from the bag can be a little tough.  So flex up those muscles, get out your piping bag and begin squeezing. Have fun!


RECIPE: Bánh Gai
*
Ingredients
1 cup of wheat flour
1 cup of tapioca flour
1/2 teaspoon of baking soda
5 tablespoons of coconut milk
 5 tablespoons of sugar
3 tablespoon of condensed milk
2 tablespoons of melted butter
2 egg yolks
1/2 teaspoon of baking soda
1/2 teaspoon of pure lemon extract
*
Prepare Flour
Pour wheat flour, tapioca flour and baking soda in a sifter and sift it. 
In a separate bowl, combine the remaining ingredients and mix it up with a whisk.
Pour the mixed liquid into the flour and kneed it for about a couple minutes. 
*
Prepare Cookies Shape
Fit a star tip into a piping bag and fill it with cookie dough. 
Squeeze the dough onto a baking sheet to form  straight lines
Use a knife to cut the dough lines into 1 1/2 inches segments.
*
*
This is how they look like without the star tip
*
Baking the Cookies
Bake it at 350 degrees for about 5 minutes or until cookies turn golden.
Remove it and let it cool. 
Keep cookies in a jar to keep them fresh and crunchy.
* * *
*
Enjoy Bánh Gai Sữa with a cup of Japanese roasted brown rice hot tea!