Vietspices Search

Thursday, July 30, 2015

Cá Hồi Chiên Tỏi Tây (Pan-Seared Salmon with Sauteed Leek)


When my older daughter Nhã-Hân started eating solid food, she had no problem with eating any type of fish. When she was four, she had a pet gold fish. A few months later, we built a koi pond and decided to give the gold fish away to our cousin. Since then, she refuses to eat fish altogether. We couldn't figure out why and one day she told us it was because we gave away her pet. Go figure.

Our family loves fish and I want her to eat healthy. Every meal with fish requires a herculean effort to coax her and eventually she would - very begrudgingly of course. She's learned to be extremely selective and negotiates for only salmon. What's a mom to do?

So now I have a tall order to create salmon recipes to please my picky eater and keep her excited about eating fish. 

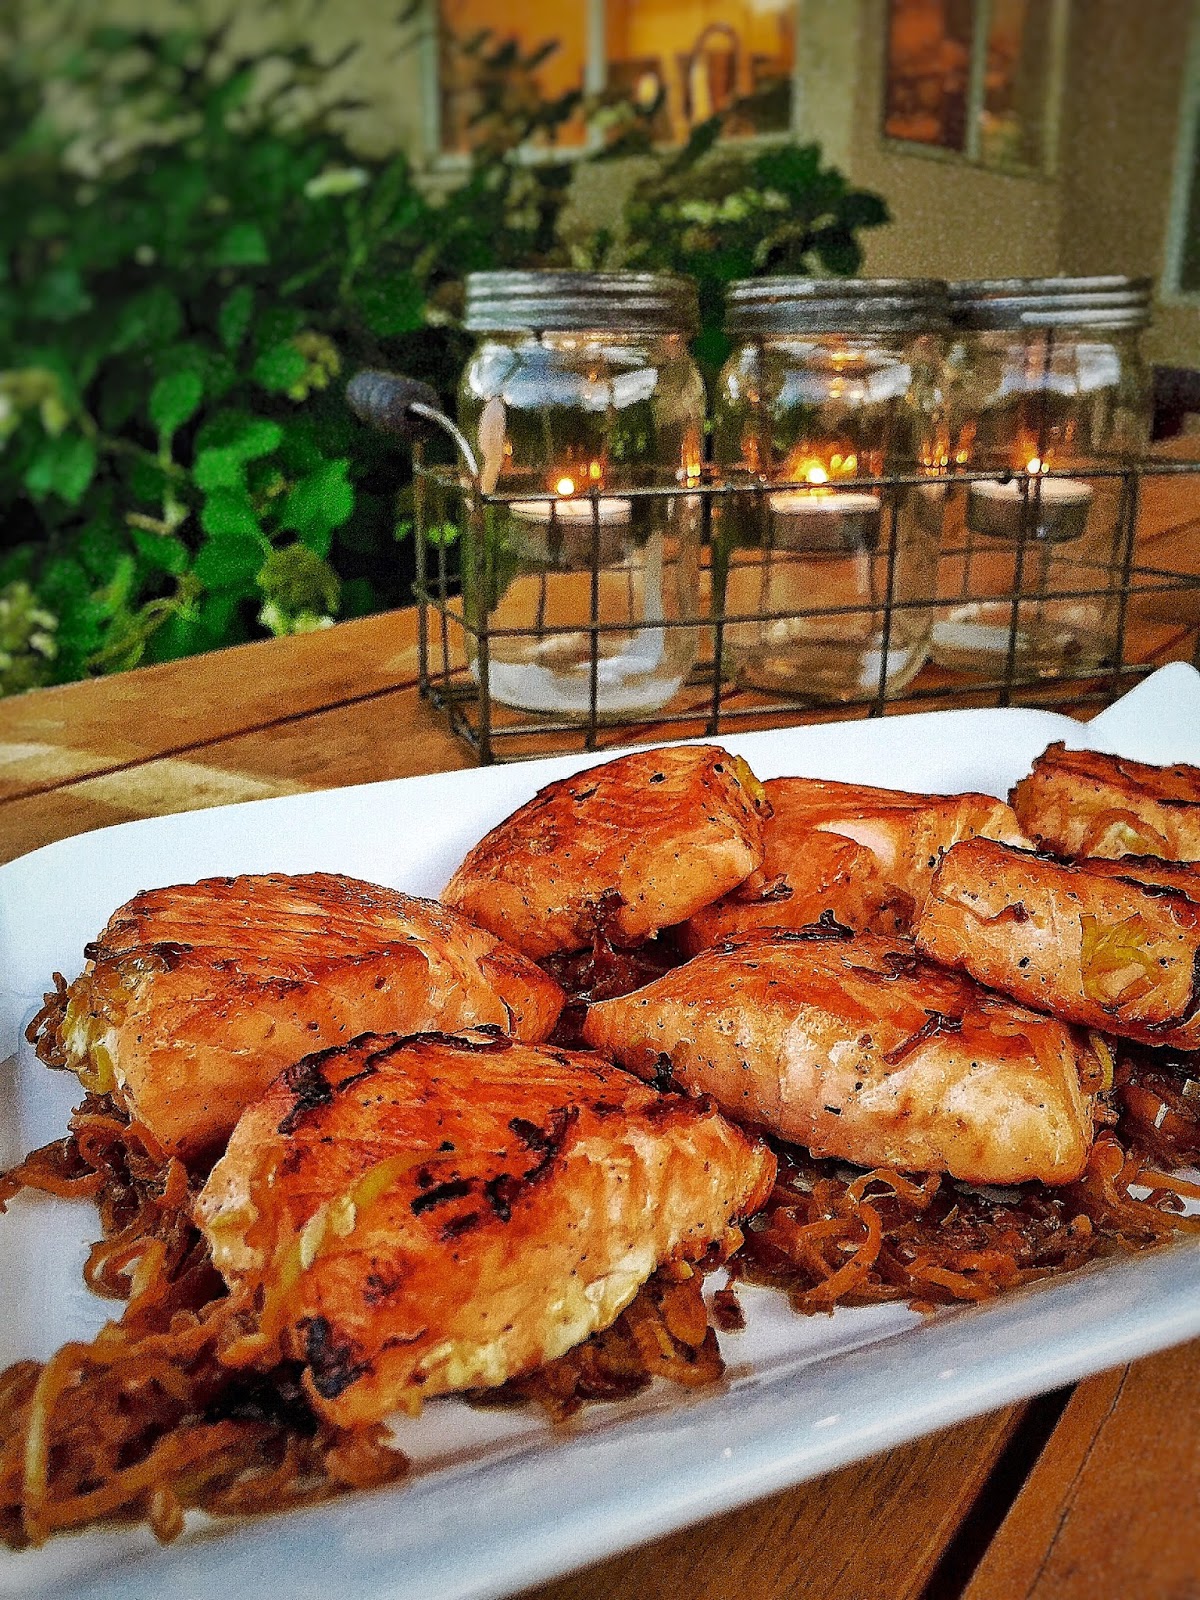
Cá Hồi Chiên Tỏi Tây (Pan-Seared Salmon with Sauteed Leek) is one of the salmon dishes that she loves. For her, the sauteed leeks that's served along with the seared salmon is the main attraction. Eating that with steamed rice is beyond satisfaction. Anything to get her to eat the salmon. 

Leeks, like garlic and onions, belong to a vegetable family called the Allium vegetables. With a more delicate and sweet flavor than onions; leeks add a subtle touch to salmon without overpowering the other flavors that are present.

This is a very simple but delicious way to prepare fresh salmon using just a few ingredients from your pantry.
*
RECIPE:  Pan-Seared Salmon with Leek
*
Ingredients


1-1.5 pounds Salmon
1 Leek
1 1/2 tablespoons Lime Juice
3 tablespoon Maggie Soy Sauce
1 tablespoon  julienned Ginger Root
1/2 teaspoon Ground Pepper
Olive Oil
*
Directions

Preparing Sauce


Ginger - cut ginger into fine julienne, make one tablespoon. Set aside. 

Leek - use only the white and light green part of leek. Slice leek thinly, make one cup. Set aside.  You can save the dark green leaves for cooking soup, stew, stock to add flavor and removed before serving.


In a mixing bowl, combine ginger, leek, lime juice, soy sauce, and pepper, and mix well.  Let it sit for about 5 minutes so that all the flavors release and blend well.

*
Preparing Salmon


Cut salmon into large pieces.  Set aside.
*
Marinating Salmon


Pour the sauce over salmon and marinate it for about 10 minutes.

*
Searing Salmon


Remove salmon from the the sauce, and leek. You don't want to fry the leek with salmon because the leek will be burnt by the time the salmon is cooked.

Bring a frying pan over medium high heat. Add about 2-3 tablespoons of olive oil. Once the oil is hot, gently place the salmon onto the pan. Do not flip the salmon right away as it will break apart. Let it cook one side until crisp and golden crust then flip over to cook the other side. 

Salmon is delicate and very easy to overcook even thick fillets of salmon will cook very quickly. Remember that the fish will continue to cook once it’s off the heat, so you want it to be slightly underdone when you take it off the heat.  Salmon tastes better on the rare side, when the center is still slightly pink.


Remove salmon from the frying pan. Place leek mixture into the frying pan and cook for a minute. Don't cook the leek too long as the water from the soy sauce will evaporate resulting in salty mixture.

*
Presentation


Serve salmon with sauteed leaks over steamed rice and garnish with cucumber and tomatoes.

Eat Well. Be Healthy!

Saturday, July 25, 2015

Chuối Bọc Nếp Nướng (Grilled Banana Wrapped in Sticky Rice)


Nothing captures the summer experience like grilling. And nothin could be sweeter than a grilled dessert. This summer, I introduced one of my childhood street desserts - Chuối Bọc Nếp Nướng (Grilled Banana Wrapped in Sticky Rice) to my family and friends. 

It's utterly impossible to ignore the aroma of burning briquettes toasting banana leaves and sticky rice on a cool evening. And when the burnt banana leaves are peeled back, a crispy golden crust is revealed with a soft delicate center waiting for you to sink your teeth in.


The dessert is incomplete until a coat of tapioca pearl coconut sauce is drizzled over and is then topped off with roasted peanut or sesame seeds.  Are you salivating yet?!

Chuối Bọc Nếp Nướng is a wonderful dessert to try on your next camping trip or on a cool evening after dinner. It's simply irresistible. 
*
RECIPE: Grilled Banana Wrapped in Sticky Rice
Ingredients


1 pack frozen or fresh ripe banana (chuối sứ), about 20 
1 cup frozen or fresh grated coconut
4 cups Sweet Rice
4 cups Water
1 teaspoon Salt
2 cans, 400 ml each, Coconut Milk
2 tablespoons Tapioca Pearls
6 tablespoons Sugar
1/2 teaspoon Salt
1-2 knots of Pandan Leave
Roasted Peanut or Roasted Sesame Seeds
1 pack frozen Banana Leaves
a large Ziploc Bag or a Plastic Bag
*
Directions

Preparing Banana Leaves

Wash  banana leaves, wipe them off with a kitchen towel, set aside.
*
Preparing Bananas


Remove bananas from bag and let them thaw. If using fresh bananas, make sure to use the ripe ones as they are sweet and don't have the bitter taste and waxy texture. Peel a banana from the bottom up, the strings will come off with the skin.
*
Cooking Sweet Rice 


Cooking Sweet Rice in a Rice Cooker - rinse rice a few times until water is clear. Drain. Pour the rice, water, grated coconut and salt in a rice cooker. Stir to combine all ingredients well. Set rice cooker to ‘Cook’. Allow to cook until the button switches over to ‘Keep Warm’. Stir the rice. Cover and let it cook for another 10 -15 minutes to ensure the sweet rice is cooked evenly.


Cooking Sweet Rice in a Pot - another quick way to cook sticky rice is in the pot. Rinse a few times until water is clear. Pour the rice, water, grated coconut and salt in the pot. Cook on high heat. Once water begins to bubble at a gentle boil, turn heat down to medium-low and cook for a couple minutes. Carefully tilt the pot and strain any liquid in the pot. Place the lid on tight and turn heat down to low so that it is just nicely simmering for about 10 minutes, stirring occasionally. When the water has been absorbed by the rice, and the rice is soft and cooked, turn of the heat and let it sit for another 10 minutes. Remove the lid, and let the sticky rice cool down.

*
Cooking Coconut Sauce


Combine knots of pandan leaves and coconut milk in a sauce pan. Cook over a medium low heat until the pandan leaves are cooked and released its aroma, usually about 8 minutes.


In the meantime, soak tapioca pearls in a bowl of water.  Bring a small pot of water to a boil.  Drain the water from tapioca pearls bowl then add tapioca pearls into the boiling pot of water. Be sure to stir often to avoid tapioca pearls clump together or get burned on the bottom of the pot.


Reduce heat to medium and cook until tapioca pearls are softened and translucent. Strain tapioca pearls using a strainer.  Set aside.


Once the coconut milk is cooked, add sugar, salt, tapioca pearls, and cook for a minute.  Turn off heat.  Set aside.

*
Roasting Peanut or Sesame Seeds


Place peanut or sesame seeds in a ziploc bag and slightly smash it.
Set aside. You can also combine both if preferred.
*
Wrapping Banana


Use a ziploc bag or a plastic bag and cut both sides to create a plastic wrapper. 

Place warm sticky rice on the plastic mat wrapper and use a spatula to press the rice flat, not too thin nor too thick. You might want to put on a pair of gloves to prevent the rice from sticking to your hands.   I find that it's a lot easier to work with warm sticky rice as the rice is a lot softer and it sticks together well. 
Place a banana on top of the sticky rice. Roll the sticky rice and banana using the plastic wrapper.


Twist both ends in opposite directions to tighten the sticky rice as shown below. Cut off any extra sticky rice from the ends of the banana. Remove from the plastic wrapping.


Tear off a long piece of banana leave and wrap up the long length of  banana sticky rice.  Take another large piece of banana leave and wrap the other side of the banana.


If you want to be fancy or artsy, use a small piece of banana leaves to create a bow.


Repeat the process until done.
*
Grilling Banana Wrapped with Sticky Rice


Charcoal Grill - place these banana sticky rice on a grill and grill until the banana leaves dry up and both sides of the  sticky rice slightly turn golden brown. Only then can you peel off the banana leaves and grill for a few more minutes until the sticky rice is golden brown all around.


Oven Roast - another way to grill these banana sticky rice is using the oven.  Set the oven to roast and preheat the oven to 450 degrees F.  When the temperature reaches 450 degrees F, place these banana sticky rice in the oven and roast until golden brown on both sides. 

*
Presentation


Plate this golden brown banana sticky rice and drizzle a generous amount of coconut sauce as you desire and sprinkle on the roasted peanut or sesame seeds - or both.   Then devour it!
*
Eat well.  Stay healthy.

Thursday, July 23, 2015

Bánh Phở Mì Tươi (Homemade Rice Noodle)


Finally it's nice to be able to sit down with a clear mind and just drift into my culinary abyss. The last six weeks have been filled with family and friends visiting from abroad. 

A few weeks ago I made mì Quảng (Quang style noodle) again. This time, I am sharing with you a recipe on how to make fresh noodle.

The vibrant yellow noodle is called Quang style noodle.  The color is the result of turmeric powder that is added to the batter. Mì Quảng is a Vietnamese noodle dish that originated from Quảng Nam province in central Vietnam.   The white noodle is called bánh phở or mì (noodle) and is perfect for phở or hủ tiếu.  I always have a mortar of smashed garlic, red chili pepper, and fish sauce nearby when I make this.  My daughters keep coming to the kitchen and dipping the noodle into the sauce to snack on.


Making any type of noodle can be an intimidating process, especially if you're not used to working with flour and water. But it's a fun skill to have and once you're comfortable with the basic technique, it's really easy to do.

It's true that homemade noodle takes more time to prepare than store-bought, but you are immensely rewarded with fresher, better-tasting noodle to serve with all kinds of dishes.
*
RECIPE: Fresh Rice Noodle
Ingredients


1 (16 oz) bag Rice Flour
2 tablespoons Tapioca Starch
1/2 teaspoon Salt
1 tablespoon Vegetable Oil
1 teaspoon Turmeric Powder, for Quang noodle
4 1/2 cups Water
*
Equipments


a Steamer
2 Baking Pans
or
Ring and Cloth for the Steamer/Pot, click here 
for instructions on how to make ring and cloth


One of my blog readers bought her rice cake steamer (picture below) for $32 from Me Kong market on Capitol in San Jose, Ca. This steamer comes with two fabrics and a round metal loop.

 *
Directions

Preparing Batter


Combine flour, salt, turmeric powder (if you're making Quang style noodle), water, and oil.  Mix well. Set aside to rest for about half an hour to allow the batter to absorb the liquid and the air bubbles to settle before steaming.


When you're ready to steam it, steam the first one to test the consistency.  If it's too thick, add a little bit more of water. How much water all depends upon your brand of flour, how old it is, and the temperature and humidly of the room.
*
Steaming Rice Cake


There are two methods of steaming rice cake.  

Method #1: using a cake pan.  This is my favorite method of making noodle because it's quick, easy and no mess.


If you don't have the metal ring and the fabric, another way to steam the rice cake is using the cake pan.  I tested out by greasing the pan with oil. Then I also tried it without oil and it was just as easy. So no need to grease the pan.

Add water 2/3 full and stack the second layer of steamer on top. Bring it to a rapid boil.

In a cake pan, ladle about 1/4 cup of batter just enough to cover the bottom of the pan. Tilt the pan to even out the batter. The rice cake should not be too thin or too thick. Your call. Place it in the steamer; cover with a lid and steam for no longer than a minute.

batter without turmeric powder

The rice cake should be bubbling when it's ready.


Remove the pan.  To cool it down quickly, place the pan on the ice water bath while placing another pan of batter in the steamer.


Remove the pan from the ice water bath.  Peel the rice cake off the pan.

My little daughter was fascinated with the process of  peeling off the rice cake from the pan and so I didn't have to do this part.


Method #2: using a steamer, metal ring, and cloth


Fill the bottom steamer with 2/3 water.  Place the fabric ring inside of the top steamer. Make sure it's straight.


Bring the steamer to a rapid boil.  Ladle about 1/4 cup of the batter onto the fabric screen. The size of the rice cake depends on the portion of the batter you pour onto the fabric screen and how big you spread the batter.


Use the bottom of the metal or coconut shell ladle like the one I used to help spread the rice batter thinly and evenly over the stretched fabric. Be sure to spread this quickly using a circular motion as the batter gets cooked very fast. Cover it up with a lid and let it steam for about 10 seconds.

Remove the lid and spread another layer of batter on top of the cooked one. The noodle needs to be thick, therefore, pouring two layers of batter is a must.


It will take a few more seconds for the steam to cook the smooth batter. The rice cake will bubble when it's ready. Use a flat and long bamboo stick to remove the rice cake, then place it directly on a cutting board.


Be sure to keep the bamboo stick in a vase of water when not using to prevent the noodle from sticking to it on the next try.  Repeat the steaming process until done.
*
Making Noodle


Before cutting the rice cake, I like to brush fried garlic oil over the rice cake, then fold it up and cut into stripes.  The fried garlic adds a wonderful fragrance to the noodles.

*
Presentation

chicken Quang style noodle

sauteed beef noodle

pork and shrimps Quang style noodle 


fried fish patties and shrimp Quang style

braised mackerel with noodle


Ăn Ngon!